Featured

Tuesday, March 8, 2011

We Have a Theme!

In the past couple weeks, Hudson has really been into farm animals and all the sounds they make.  He knows how to say them all and his new favorite word to say is "barn".  With that in mind, I decided on a party theme for his upcoming 2nd birthday, Barnyard Fun.

I found this amazing shop on Etsy called Stockberry Studios that has the most adorable clipart vectors, and since I'm into making my own decorations, that was right up my alley.  And the best part...it only ran me $5.00!!  They have tons more clipart available and I can't wait to be able to use it in the future.  They also have lots of super cute personalized invites and printable party packages at very affordable prices.  They also have a blog you can check out: Stockberry Studios Blog

Here is a peek at my order!


I can't wait to get started on the invites and decorations!

* I was not paid or perked for this post. I just love their products and thought you might be interested too!


Photobucket

Thursday, March 3, 2011

Recipe Time: S*#& on a Shingle

AKA: Chip Beef or Corned Beef and Gravy on Toast

I guess it got the name S*#& on a Shingle because they used to serve it in prison...sounds tempting huh?!  Anyway, my mom has been making it for us since my sister and I were little.  Back then I didn't like it much, but it's grown on me over the years and now it's one of those stick-to-your-ribs meals that sounds delicious on a cold winter night.  Hopefully those kinds of nights are soon to be long gone for the year, but if not, this recipe is super easy and can be spiced up anyway you want.

Ingredients:
1 pkg. sliced corned beef  (I use Buddig)
2 tbsp unsalted butter
2 heaping tbsp flour
1 cup (at least) of milk  (I use low fat milk, but any kind is fine)
Salt and Pepper to taste
4 slices of bread for toast and butter to spread

Optional Ingredients:
onion powder
garlic powder
cayenne pepper

Directions:
Cut entire package of beef into small squares.  Set large skillet over medium heat and add butter and beef.  Stir together until butter is melted.  Add heaping tablespoons of flour and let flour cook for 1 minute, stirring constantly.  Add milk slowing, constantly whisking into other ingredients to form a smooth gravy.  The gravy will thicken quickly, so continue to add milk until you have to right amount of gravy that you need.  You may use more or less than 1 cup of milk depending on the desired amount of gravy.  Once you have the desired amount; add salt and pepper to taste as well as any other seasonings.  Toast bread and spread with butter then top with gravy and serve immediately. 


This is a really old recipe, but worth trying, especially if you are a gravy lover like me! 

I'll pretty much eat anything that involves gravy!!  Yum!


Photobucket

Wednesday, March 2, 2011

Our Project To-Do List

Over the past couple months the hubby and I have come up with quite the home improvement to-do list!  Once we started talking about it and writing them down, the ideas just kept flowing.  So, in order to organize all our ideas and thoughts, we compiled a list and divided it up by room.  We decided to hang in on our fridge so that anytime we tackled a project, we could cross it off the list, plus that way we are constantly reminded of all the things we need to do.

(Don't mind our outdated almond colored fridge...replacing it is one of the things on our to-do list)

It may no be the most sophisticated way to go about things, but it's working for us so far.  Now the next move is to actually start crossing things off!!


Photobucket

Monday, February 28, 2011

Super Simple Update

One of the first things we changed in our house was all the door handles.  When we moved in, they looked like this:


Totally not our style, nor were they even in good shape.

So after saving up a little cash...door hardware gets pretty pricey when you buy it all at once,  we bought some more modern brushed nickel handles that we liked much better.  We both agreed that they completely changed the look of the doors.  Here's what they look like now:


It's amazing how changing something so small can have such a big impact.  It's definitely something to consider when updating your house.

Oh, and in other news, we found out on Friday that we're joining the Pink Team this time around.  Yep, that's right, we're expecting a Baby Girl!!!!!!!!!!  We couldn't be more thrilled!!  I can't wait to get started on the nursery.  I'll definitely be making lots of changes to that room and plan on diying most of the things, so I'll have tons to post about in the near future!

Photobucket

Friday, February 25, 2011

Happy Friday!

I'm so happy it's Friday!  We finally get to find out if we're having a boy or a girl...after waiting an extra four weeks!!  This baby better be ready to flash the "goods" today!  And not only are we finding out what we're having today, but tomorrow we get to take our little man to the circus!  I don't know who'll be more excited, me or the little man!!

At the circus last year

I hope you all have a great weekend!

Here is where I'm linking up today:

Photobucket

Wednesday, February 23, 2011

Kitchen Floor Makeover

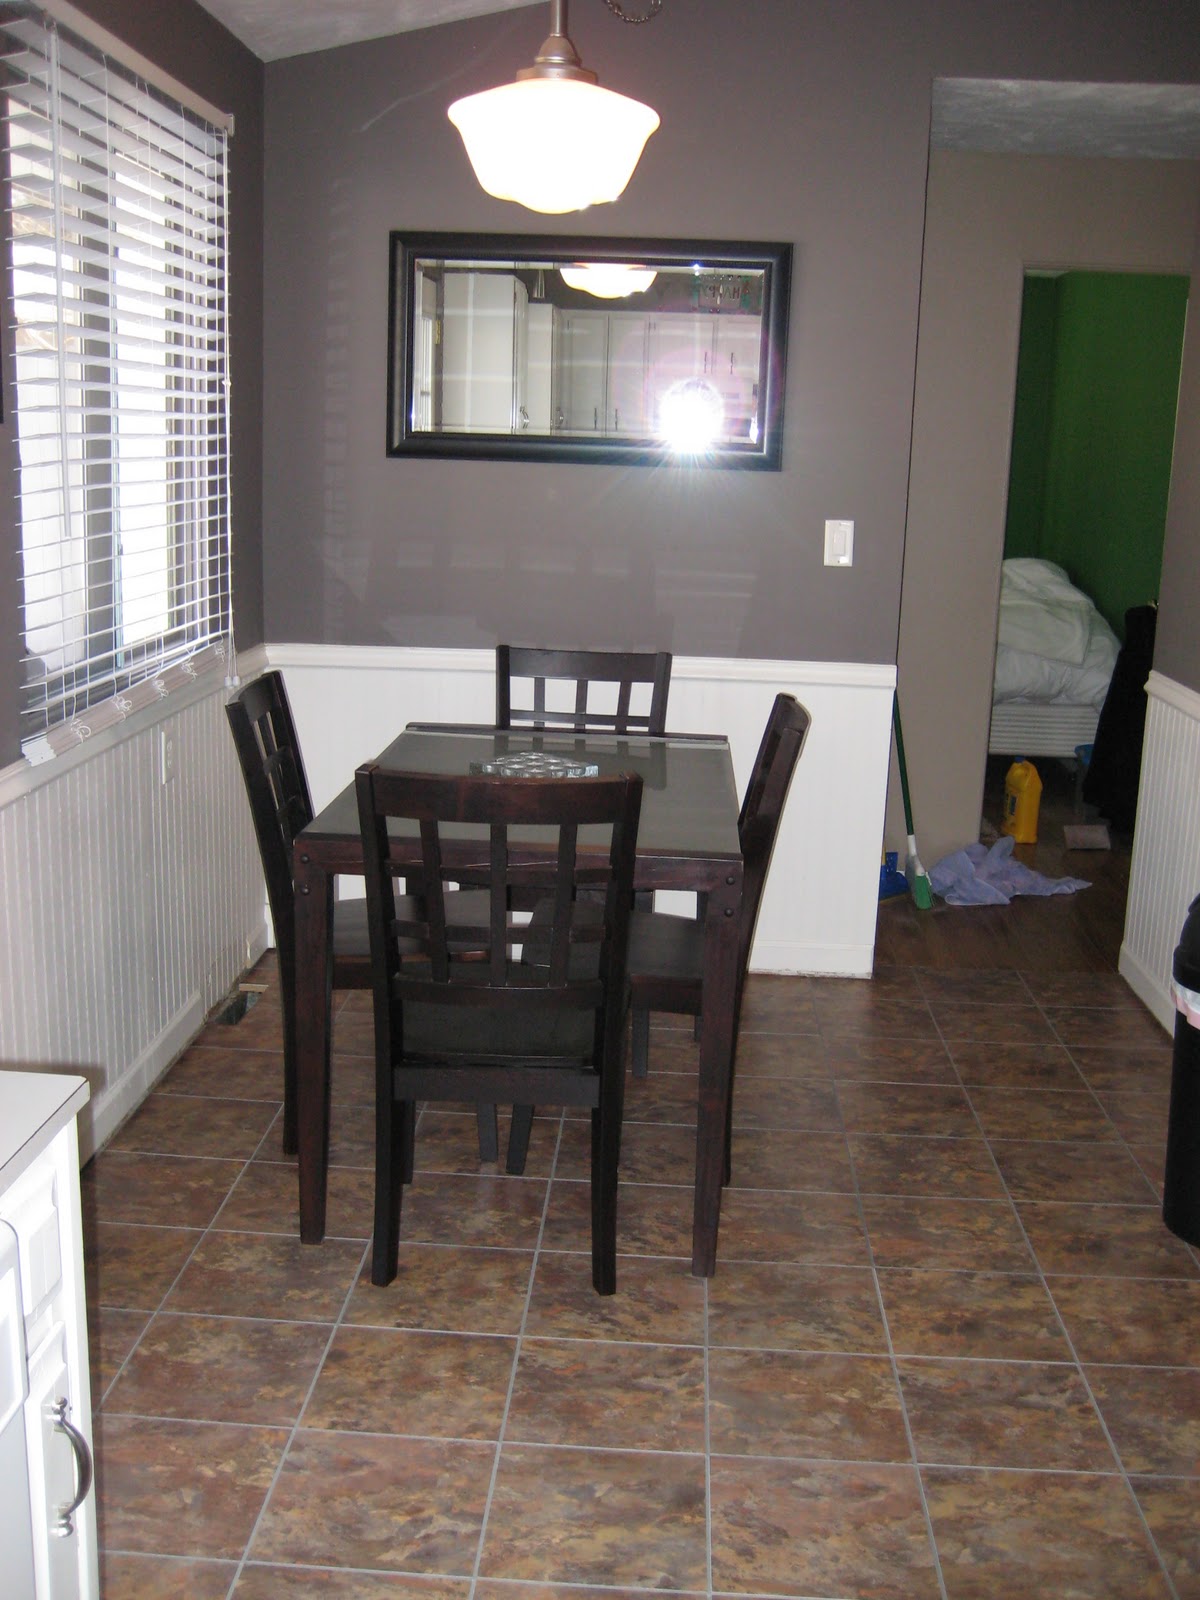
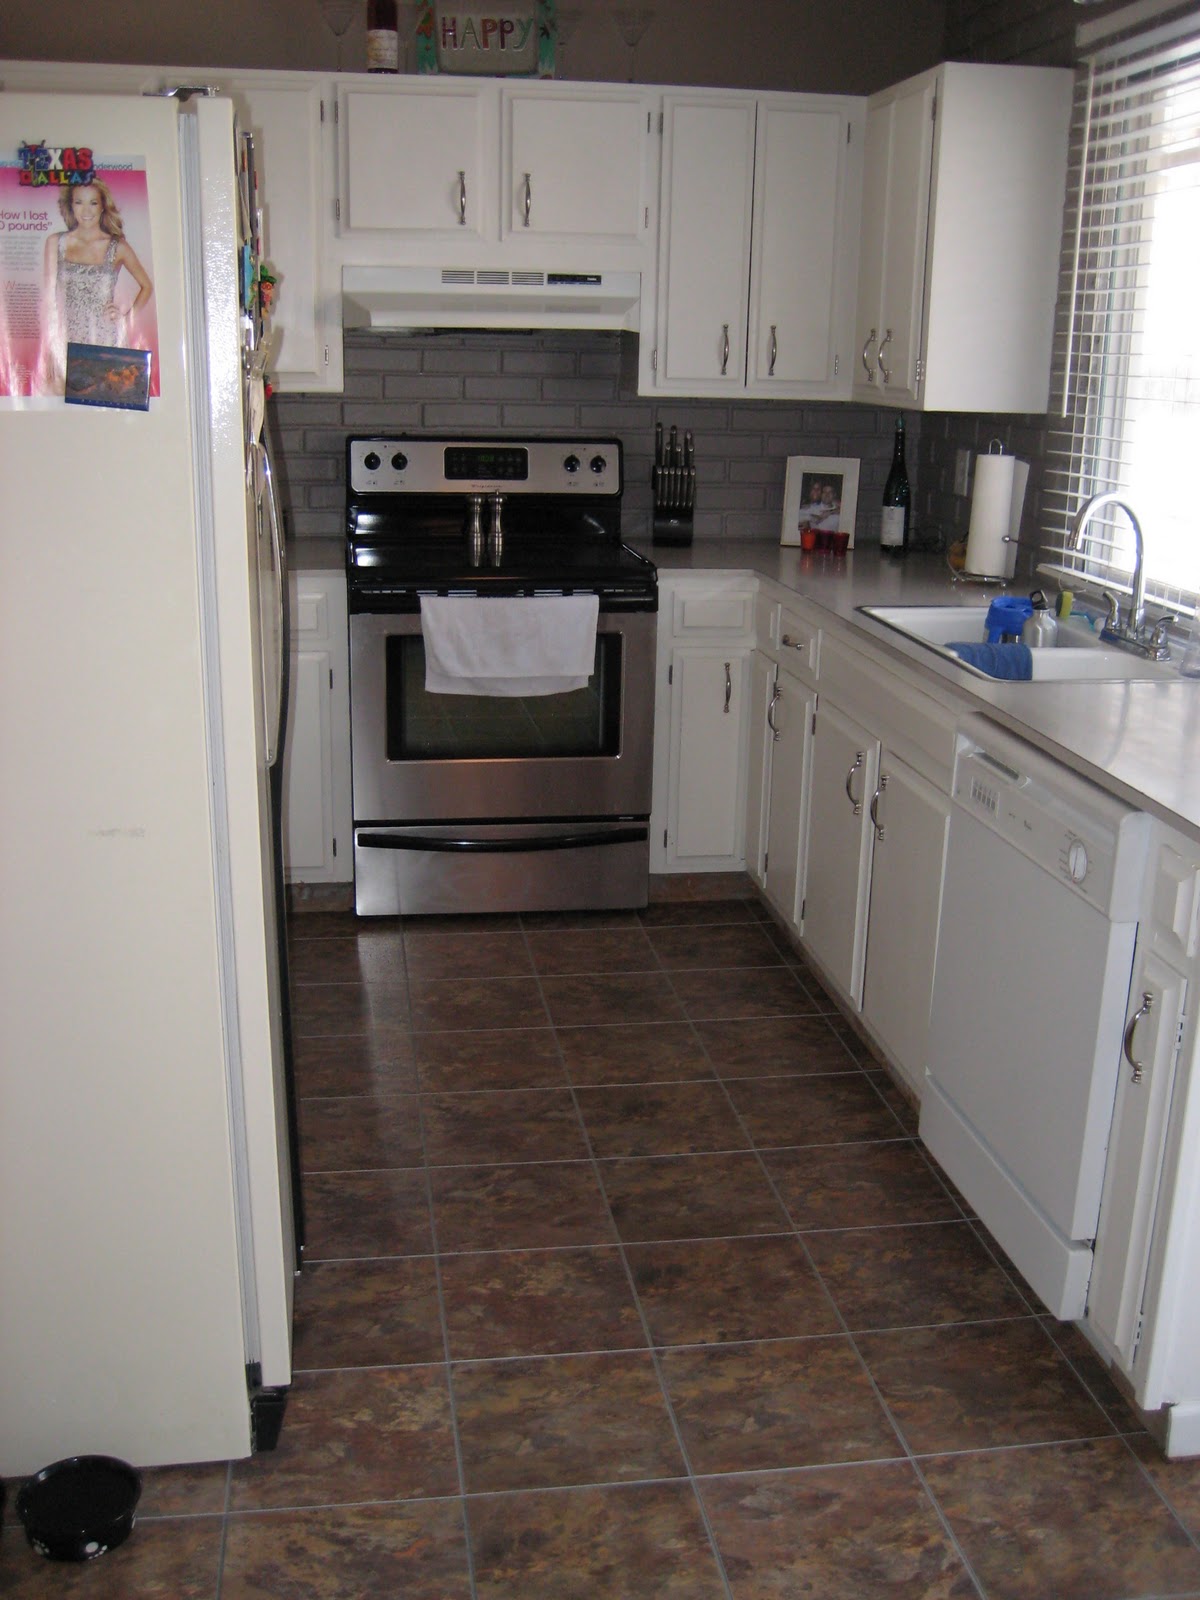
Waaaaayyyy back in February of 2008, a long time before I even thought about starting a blog, we gave our kitchen floor a makeover.  We didn't have a lot of extra money back then because we had just bought the house that summer and got married a month later, but the floor was AWFUL.  The tile was hideous, the grout hadn't been sealed properly and was breaking out and it was horribly stained.  No matter how much I cleaned it, it always felt dirty and looked dirty.  Anyway, I digress, I finally convinced my hubby that we could make it look and feel a whole lot better, even if we just bought some cheap linoleum tiles.  We shopped around and found some we liked at Menard's (that happened to be on sale!) and bought them.  My parents made the trip down to O-town to help us pull it all off.

As it turns out, which we already kinda figured, whoever put the tile in had absolutely NO idea what they were doing, so we had a much bigger project on our hands than we originally thought.  So, we called in more help and my father-in-law came over with some more tools and an extra pair of hands.

Here is what the kitchen looked like the weekend we moved in; hate the color, hate the light fixture, really hate the floor and who puts a tv on a wall stand these days other than cheap motels??

Here are my handy dad and handy hubby tearing out the subflooring which had about a million nails holding it in place.  It was cement board and the wrong material to use under the tile.  It made the kitchen floor about 1/2 inch higher than the rest of the floors.

 Here is my father-in-law measuring out the plywood to be used as the new subflooring.

 Here is a shot of all the trash that we ended up with, and that sat on our deck covered by a tarp until the weather got nice.  Actually, I think we ended up with more bags than are shown in the picture.

 We added our names and the date to the floor boards as a personal touch!

Here is a really flattering picture of me laying down the new linoleum tiles.

 And here is a picture of what the floor looks like now.  It's not what I would've chosen if we could've afforded something better, but it works for this house.  But one thing that doesn't work is that disgusting light fixture!!  It's still there and I still hate it, but I'm not so sure what I want there, so it stays for now.


I wish I had better pictures of the entire process, but like I said, I wasn't blogging at the time and never really intended to, so these were just taken for us to document our accomplishment of installing a new floor.

There is still a lot that we need to do in that kitchen, so hopefully I'll be getting around to more projects soon!

Photobucket

Monday, February 21, 2011

A Blue Room

Since we have a new baby on the way in a few months, we're finally starting to finish some projects around the house that we've been putting off for months.  One of those projects is painting our son's room  and slowly converting it into more of a "big boy" room.  We knew we wanted to paint it a color in the aqua category, but hadn't settled on one yet.  Here are the samples that we liked the best:

The first one on the left is Lagoon by Martha Stewart.  The next one is Embellished Blue by Behr, and the last one is Atta Boy Blue by Disney.

And the winner is...Lagoon by Martha Stewart! 

We decided that Embellished Blue was a little too light and baby blueish and we thought that Atta Boy Blue would probably be a little too dark once it was on the wall.

Our goal is to have a light, bright, fun room for our growing little boy, and hopefully a color that can stay for a while.  I'm thinking we should have it all painted by the end of the week, so I'll be sure to post some before and after pics!

Photobucket

Monday, February 14, 2011

Show & Tell: Trunk Love

I've been wanting this trunk for over a year and now I finally have it!  It was an early birthday gift from my parents.  I wanted it last year for my birthday, but refused to let my mom buy unless it was on sale.  I mentioned it 2 months before my birthday, thinking it would go on sale beforehand, but it never did.  It actually didn't go on sale one time until the end of the summer, so needless to say, I didn't get it.  About 3 weeks ago, to my surprise, I spotted it on sale in the Target ad for $20 off, and my birthday is just around the corner (in March)!!  Oh happy day!  Not only do I need the storage, but I love the way it looks.  Here is my beautiful new birthday trunk in action!!

See that gorgeous bedding in the background?  We bought it a couple months ago.  I was inspired by my favorite home improvement blog, Young House Love.  More on that later!


Photobucket

Wednesday, February 9, 2011

Another Party Idea

First, I somehow messed up my blog header this morning and need the hubby to fix it when he gets home tonight, so it will look like this the rest of the day.  Bummer.

Anyway,  here is another idea for Hudson's 2nd birthday party.  He is really in to Mickey Mouse at the moment, so I thought maybe a Mickey party would be fun for him.  I found these cute ticket style invitations at Fun Invites on Etsy.com.  If I got these, I would make the rest of the decorations myself.


I'm stilll leaning toward the space party idea, but I'm trying to explore all my options.
Photobucket

Tuesday, February 8, 2011

Birthday Party Planning

Even though Hudson's 2nd birthday isn't until April, I've already been thinking about party themes and decorations.  Today The Celebration Shoppe unveiled a new "space" design that I think is absolutely adorable!  I'm definitely adding this to my options!  Check it out!

She has so many great designs!!

I plan to share all the possible themes I find along the way, and if you have any suggestions I would love to hear them!

Here is where I'm linking up today:

Photobucket

Wednesday, February 2, 2011

Nesting Already?

Currently our nursery for the new baby is still the guest bedroom...or I should say the catch-all room.  I always had high hopes for it to become a cozy, inviting guest bedroom.  That never happened, and now it never will.  So, I've started slowly prepping it to become the nursery. 

The first thing that needed to be done was to clean out and organize all of our closets in order to make room for most of the items from the guest closet.  I started with my closet, then moved on to the coat closet and finally started arranging the guest nursery closet. (My husband cleaned out his own closet a couple of months ago)

Unfortunately, I didn't take before pictures of any of the closets, so these after pictures won't be as impressive, but trust me, the closets were horrible!  They had been neglected for months and months, if not years!
Hall Coat Closet


 My Closet
(I still need to get a shoe rack)

 Hubby's Closet
(didn't my hubby do a good job organizing it?)

 Nursery Closet
(a work in progress, but already sooo much better than what it was)

I love how good it feels to open an organized closet.  I'm huge on organization, so this is a great project for me to tackle in the winter.  Anyone else stuck inside getting things done?

Photobucket

Thursday, January 27, 2011

Valentine's Day Decor

I'm not a big decorator when it comes to Valentine's Day, but I did manage to pull a few things together.  Nothing special, but I think it adds that little pop of color and charm to our living room.  As I mentioned before, we don't have a mantel, so I usually decorate the shelves about our entertainment center. 

The Valentine subway art is a free printable from eighteen25.  I just love it!  I bought the heart votive holders from Target years ago and I think the love sign is from Michaels a few years back.  I was thinking about adding some Valentine candles too, but haven't seen any I'm crazy about, so I may have to make some.

 And this is the small cutout that looks through to the kitchen.  I just added some hot pink lights and a few pictures of me and my cute hubby.  One of the pics is the very first picture we ever took together and the other is from our wedding day.  Then I picked up the little red mailbox from the $1 section at Target.  I plan on filling it with treats for the little guy on the big day.

 And you saw this picture already.  Hudson loves it when I put clings on the windows.  He's constantly taking them off and I'm constantly putting them back on!  It's so much fun!!

So, like I said, it's not much, but it's enough for this year.  Maybe as the kids get older I'll be more inclined to go a little bigger.

Photobucket

Tuesday, January 25, 2011

Project Incomplete

Well, I didn't get to make my Valentine heart wreath this past weekend.  I made the trip to JoAnn Fabric to pick up the supplies and they were still all out of the styrofoam heart wreath!  I was so bummed and didn't feel much like driving all over town in search of one.  So, unless they get the heart in this week, I may have to wait until next year to make one.

Even though I didn't get to make my wreath, I did get to spend Saturday afternoon at the spa getting a 60 min. massage, 30 min. facial, mani and pedi!  My sweet hubby had given me a gift certificate for my birthday last March and I just got around to finally using it!!  It was wonderful!  I wish it was something I could afford to do more often!  So, if you live in the Omaha area, check out Urbane Salon and Day Spa down in the Old Market.

 (salon image can be found here)

Photobucket

Friday, January 21, 2011

Weekend Project: Heart Wreath

I saw this adorable and easy to make heart wreath here at eighteen 25 and plan on making one for myself this weekend.  I love the red, but may have to pick a different color if I want to hang it on our front door because the door is red or I maybe I can find a cute place to hang it in the living room. 


I'm also going to try and con my hubby into painting our son's bedroom ceiling and the crown molding.  His room isn't as bad as the rest of the house, but probably hasn't been painted since 1963 when the house was built!!

This is what it looks like outside here today.  You can't tell in the picture, but it's snowing again!  And it's supposed to snow more this weekend. 
Spring where are you?!  Please hurry and get here fast!!

Here is where I'm linking up today:


Photobucket

Tuesday, January 18, 2011

Breakfast for Dinner

One of my favorite things for dinner is breakfast, especially when you're short on time.  A couple of months ago I found a simple looking recipe in Everyday Food using a muffin tin to make breakfast.  Well, I finally got around to trying it last night and it was delicious!  Here it is:

Bacon, Egg and Toast Cups

Recipe
makes 6
total time:  35 min

3 tbsp unsalted, melted butter
8 slices white or wheat sandwich bread
6 slices bacon or crumbled sausage
6 large eggs
coarse salt and pepper to season

Preheat oven to 375 degrees.  Lightly butter 6 standard muffin cups. (I used a cupcake tin instead because I didn't have a muffin tin and it worked just fine.)  With a rolling pin, flatten bread slices slightly and, with a 4 1/2 inch cookie cutter, cut into 8 rounds. ( I didn't have a cookie cutter, so I used the largest glass I had and just cut around the circle.  Worked great.)  Cut each round in half, then press 2 halves into each muffin cup, overlapping slightly and making sure bread comes up to edge of cup.  Use extra bread to patch any gaps. (Because I used a cupcake tin, I only  needed one piece of bread per cup.)  Brush bread with remaining butter.

In a large skillet, cook bacon over medium, until almost crisp.  4 minutes, flipping once.  It will continue to cook in oven. (I cooked my bacon in the microwave for 3 minutes to make it even faster and much less clean-up.)    Lay 1 bacon slice in each bread cup and crack an egg over each.  Season with salt and pepper.  Bake until egg whites are just set, 20 to 25 minutes.  Run a small knife around cups to loosen toasts.  Serve immediately.

These were so easy to make and yummy too.  A fun meal to serve for breakfast or dinner.  Kids would love to help!  Here is an after picture:

I only made 4, so the recipe is easily adjustable.

I wish I would've taken a picture of them on the plate so you could see the golden brown toast.  Sorry!

Enjoy!!

I'm linking up this recipe here:
33 Shades of Green
Photobucket