Featured

Monday, March 28, 2011

The Perfect Baby Accessory

When Hudson was born we took a monthly photo of him until he turned 1.  We just dressed him in whatever cute little outfit we had and snapped a picture.  Well, I've recently been seeing monthly onesie stickers floating around the web, so the first place I started looking was Etsy.  (I love browsing around Etsy.com, especially at all the great baby stuff. ) There are a TON of great shops with so many adorable options! 

So, I waited until we found out what we were having and then shopping until I found the perfect stickers.  I ended up purchasing some from a shop called Baby Smiles.  They had at least five or six that I had a really hard time choosing between.  I knew I wanted some with bright colors and a special thirteenth sticker saying "just born" for the baby girl to wear in the hospital.  Like I said in my last post, I've really been getting into the whole owl thing lately...I know they've been popular for a while and I've always liked them, but recently I'm a little obsessed!  That being said, these stickers quickly became my first choice.


All images courtesy of Etsy.com


I liked them so much that I ended up ordering the same ones for my sister that is due just a week before me!

They also have similar owls for baby boys and in other colors.

So, if you're in the market for onesie stickers whether it's for you or for a gift, I would definitely suggest checking out Baby Smiles.

Photobucket

*I was not paid or perked for this post.  I am just a happy customer and thought I'd share my cute find with you!

Monday, March 21, 2011

Jumping on the Bandwagon

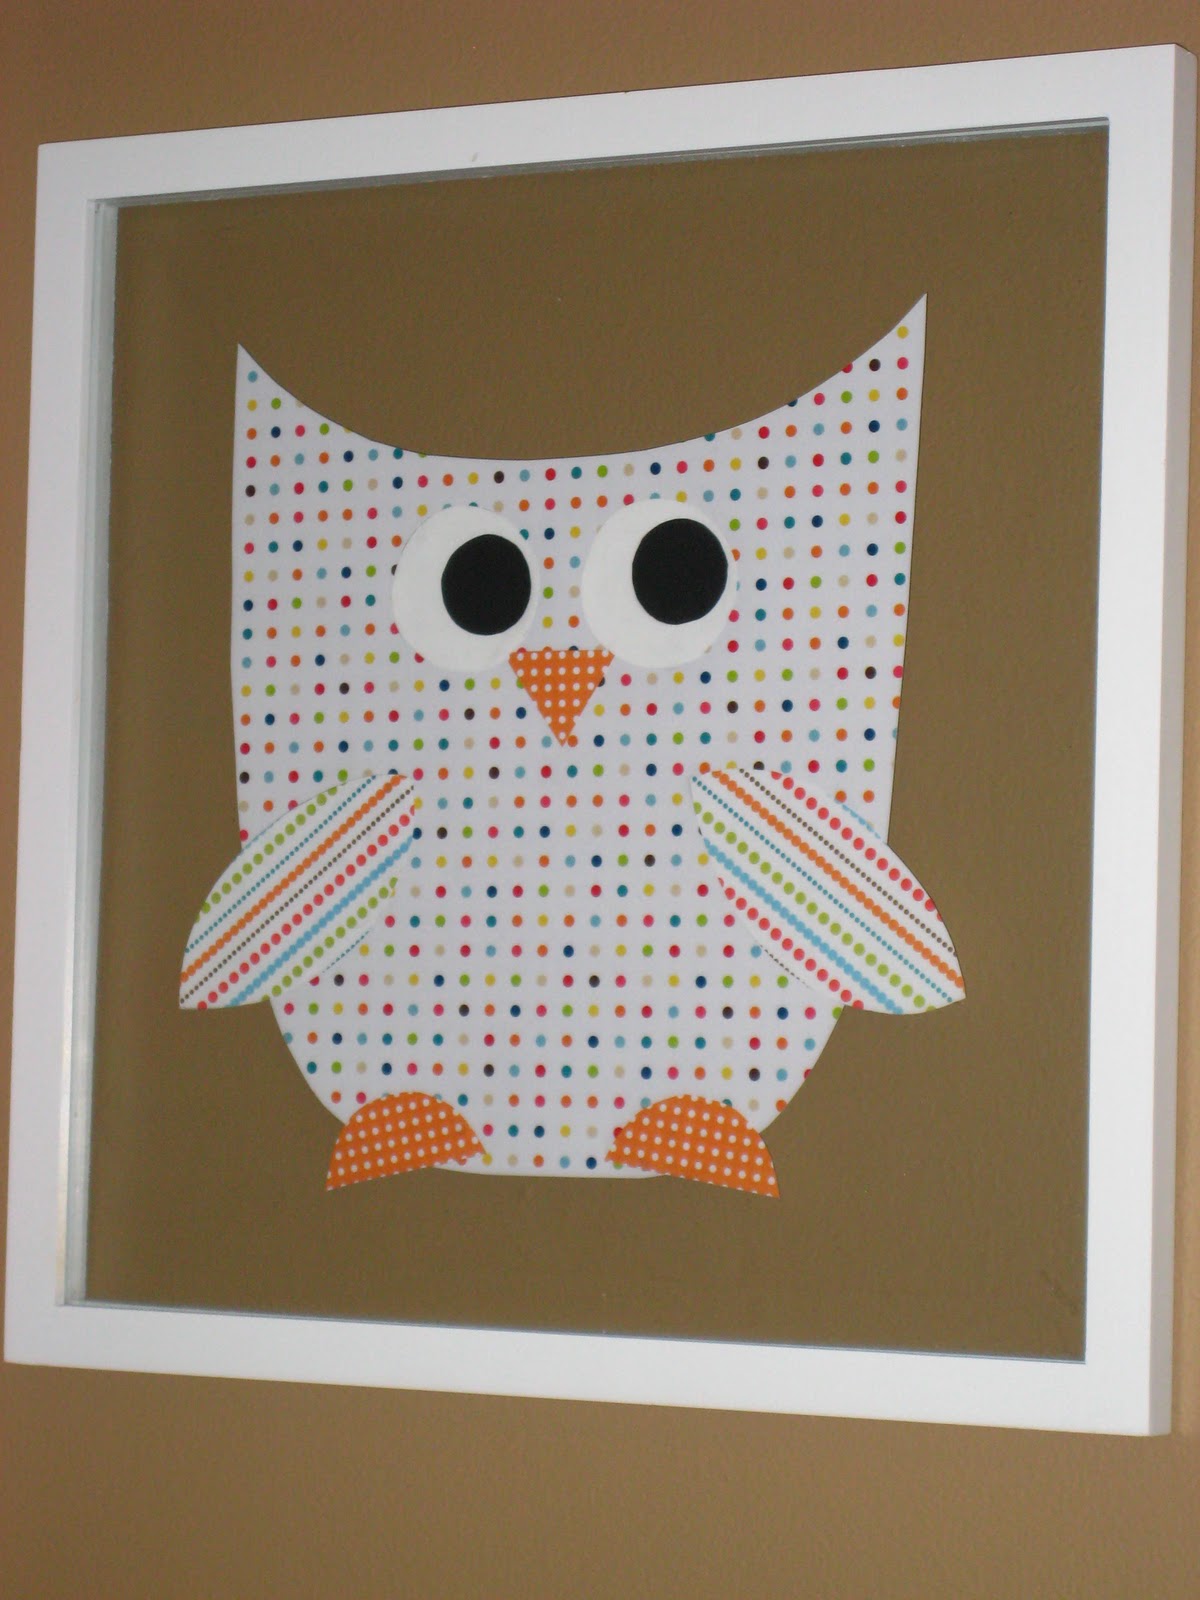
Recently I've been loving all things owl, just like the rest of blog land, and the little guy is really into them now too.  Every time he sees one, he points and yells out, "Woo, Woo!"  It's really cute!  Anyway, I thought I would make him an owl of his own to watch over him while he sleeps.  It's nothing fancy...simply made out of some scrapbook paper I had on hand.  He loves it!  The process was as easy as it gets:

Find some cute scrapbook paper.  I had some cute polka dot paper on hand, so I used that.

 Then I drew, freehand, the body of the owl.

 Once, I had the body cut out, I drew the other parts and cut them out.

Next, I glued all the parts together into an owl.  I wanted to leave some space on the center in case I decide to add his initial or something fun there later.

 And finally, I put it in a frame that was already hanging in his room.
I'm pretty happy with how it turned out!  It's not perfect, but I think it looks pretty cute and you can't beat free artwork.

 We plan to paint his room aqua soon, as I mentioned in this post, and then I think the colors will really pop.

As you can see, artwork can be made easily, out of pretty much anything.


Photobucket

Friday, March 18, 2011

Welcome Spring!

It's finally starting to show signs of spring here in Nebraska!  We couldn't be more excited!  Especially the little guy.  He loves playing outside.

The proof that spring has sprung around here...

Can you see my daylilies poking through?  Once they break through, they really take off, so it won't be long and they'll be in full bloom!

I hope spring is starting in your neck of the woods!

**And stay tuned because we have TONS of home improvement, decorating and landscaping projects to come here this Spring and Summer!


Photobucket

Thursday, March 17, 2011

Happy St. Patty's Day!

Wishing everyone a very Happy St. Patrick's Day filled with tons of luck and maybe a green beer or two!

I get to spend the day with my little leprechaun!  Isn't he cute?!


Photobucket

Thursday, March 10, 2011

Slow Progress

I've been searching the web looking for fabric for our baby girl's nursery.  I wasn't having much luck until yesterday afternoon.  I wanted something with a large, bright floral pattern, but wasn't having any luck finding one. Going into the search I wanted the fabric to include pink (but not too much pink), aqua, and green.  Apparently that is too much to ask when looking for a big, floral pattern!  But the more I looked at this fabric, the more I fell in love with it and think it will make very pretty curtains and maybe a dust ruffle as well.

Dena Designs-Kumari Garden Sujata in Pink

We plan to paint the walls a soft gray and add pops of color throughout the room.  Such as painting this dresser a blue or pink color!  I know I showed this forever ago saying it was my next redo, well I had decided that I wanted to wait until we found out what we were having so I could paint it a color instead of white or black.  And the color would be determined by the look of the room.  So now I can  the hubby can finally get to work refinishing it! 


And adding lots of color on the walls with custom artwork.  I already have a few ideas churning! 
I can't wait to get started!!

What do you think of my fabric choice?  Have you come across any bright, colorful fabric in a large floral pattern?  If so, I would love to check it out! 

Photobucket

Tuesday, March 8, 2011

We Have a Theme!

In the past couple weeks, Hudson has really been into farm animals and all the sounds they make.  He knows how to say them all and his new favorite word to say is "barn".  With that in mind, I decided on a party theme for his upcoming 2nd birthday, Barnyard Fun.

I found this amazing shop on Etsy called Stockberry Studios that has the most adorable clipart vectors, and since I'm into making my own decorations, that was right up my alley.  And the best part...it only ran me $5.00!!  They have tons more clipart available and I can't wait to be able to use it in the future.  They also have lots of super cute personalized invites and printable party packages at very affordable prices.  They also have a blog you can check out: Stockberry Studios Blog

Here is a peek at my order!


I can't wait to get started on the invites and decorations!

* I was not paid or perked for this post. I just love their products and thought you might be interested too!


Photobucket

Thursday, March 3, 2011

Recipe Time: S*#& on a Shingle

AKA: Chip Beef or Corned Beef and Gravy on Toast

I guess it got the name S*#& on a Shingle because they used to serve it in prison...sounds tempting huh?!  Anyway, my mom has been making it for us since my sister and I were little.  Back then I didn't like it much, but it's grown on me over the years and now it's one of those stick-to-your-ribs meals that sounds delicious on a cold winter night.  Hopefully those kinds of nights are soon to be long gone for the year, but if not, this recipe is super easy and can be spiced up anyway you want.

Ingredients:
1 pkg. sliced corned beef  (I use Buddig)
2 tbsp unsalted butter
2 heaping tbsp flour
1 cup (at least) of milk  (I use low fat milk, but any kind is fine)
Salt and Pepper to taste
4 slices of bread for toast and butter to spread

Optional Ingredients:
onion powder
garlic powder
cayenne pepper

Directions:
Cut entire package of beef into small squares.  Set large skillet over medium heat and add butter and beef.  Stir together until butter is melted.  Add heaping tablespoons of flour and let flour cook for 1 minute, stirring constantly.  Add milk slowing, constantly whisking into other ingredients to form a smooth gravy.  The gravy will thicken quickly, so continue to add milk until you have to right amount of gravy that you need.  You may use more or less than 1 cup of milk depending on the desired amount of gravy.  Once you have the desired amount; add salt and pepper to taste as well as any other seasonings.  Toast bread and spread with butter then top with gravy and serve immediately. 


This is a really old recipe, but worth trying, especially if you are a gravy lover like me! 

I'll pretty much eat anything that involves gravy!!  Yum!


Photobucket

Wednesday, March 2, 2011

Our Project To-Do List

Over the past couple months the hubby and I have come up with quite the home improvement to-do list!  Once we started talking about it and writing them down, the ideas just kept flowing.  So, in order to organize all our ideas and thoughts, we compiled a list and divided it up by room.  We decided to hang in on our fridge so that anytime we tackled a project, we could cross it off the list, plus that way we are constantly reminded of all the things we need to do.

(Don't mind our outdated almond colored fridge...replacing it is one of the things on our to-do list)

It may no be the most sophisticated way to go about things, but it's working for us so far.  Now the next move is to actually start crossing things off!!


Photobucket

Monday, February 28, 2011

Super Simple Update

One of the first things we changed in our house was all the door handles.  When we moved in, they looked like this:


Totally not our style, nor were they even in good shape.

So after saving up a little cash...door hardware gets pretty pricey when you buy it all at once,  we bought some more modern brushed nickel handles that we liked much better.  We both agreed that they completely changed the look of the doors.  Here's what they look like now:


It's amazing how changing something so small can have such a big impact.  It's definitely something to consider when updating your house.

Oh, and in other news, we found out on Friday that we're joining the Pink Team this time around.  Yep, that's right, we're expecting a Baby Girl!!!!!!!!!!  We couldn't be more thrilled!!  I can't wait to get started on the nursery.  I'll definitely be making lots of changes to that room and plan on diying most of the things, so I'll have tons to post about in the near future!

Photobucket

Friday, February 25, 2011

Happy Friday!

I'm so happy it's Friday!  We finally get to find out if we're having a boy or a girl...after waiting an extra four weeks!!  This baby better be ready to flash the "goods" today!  And not only are we finding out what we're having today, but tomorrow we get to take our little man to the circus!  I don't know who'll be more excited, me or the little man!!

At the circus last year

I hope you all have a great weekend!

Here is where I'm linking up today:

Photobucket

Wednesday, February 23, 2011

Kitchen Floor Makeover

Waaaaayyyy back in February of 2008, a long time before I even thought about starting a blog, we gave our kitchen floor a makeover.  We didn't have a lot of extra money back then because we had just bought the house that summer and got married a month later, but the floor was AWFUL.  The tile was hideous, the grout hadn't been sealed properly and was breaking out and it was horribly stained.  No matter how much I cleaned it, it always felt dirty and looked dirty.  Anyway, I digress, I finally convinced my hubby that we could make it look and feel a whole lot better, even if we just bought some cheap linoleum tiles.  We shopped around and found some we liked at Menard's (that happened to be on sale!) and bought them.  My parents made the trip down to O-town to help us pull it all off.

As it turns out, which we already kinda figured, whoever put the tile in had absolutely NO idea what they were doing, so we had a much bigger project on our hands than we originally thought.  So, we called in more help and my father-in-law came over with some more tools and an extra pair of hands.

Here is what the kitchen looked like the weekend we moved in; hate the color, hate the light fixture, really hate the floor and who puts a tv on a wall stand these days other than cheap motels??

Here are my handy dad and handy hubby tearing out the subflooring which had about a million nails holding it in place.  It was cement board and the wrong material to use under the tile.  It made the kitchen floor about 1/2 inch higher than the rest of the floors.

 Here is my father-in-law measuring out the plywood to be used as the new subflooring.

 Here is a shot of all the trash that we ended up with, and that sat on our deck covered by a tarp until the weather got nice.  Actually, I think we ended up with more bags than are shown in the picture.

 We added our names and the date to the floor boards as a personal touch!

Here is a really flattering picture of me laying down the new linoleum tiles.

 And here is a picture of what the floor looks like now.  It's not what I would've chosen if we could've afforded something better, but it works for this house.  But one thing that doesn't work is that disgusting light fixture!!  It's still there and I still hate it, but I'm not so sure what I want there, so it stays for now.


I wish I had better pictures of the entire process, but like I said, I wasn't blogging at the time and never really intended to, so these were just taken for us to document our accomplishment of installing a new floor.

There is still a lot that we need to do in that kitchen, so hopefully I'll be getting around to more projects soon!

Photobucket

Monday, February 21, 2011

A Blue Room

Since we have a new baby on the way in a few months, we're finally starting to finish some projects around the house that we've been putting off for months.  One of those projects is painting our son's room  and slowly converting it into more of a "big boy" room.  We knew we wanted to paint it a color in the aqua category, but hadn't settled on one yet.  Here are the samples that we liked the best:

The first one on the left is Lagoon by Martha Stewart.  The next one is Embellished Blue by Behr, and the last one is Atta Boy Blue by Disney.

And the winner is...Lagoon by Martha Stewart! 

We decided that Embellished Blue was a little too light and baby blueish and we thought that Atta Boy Blue would probably be a little too dark once it was on the wall.

Our goal is to have a light, bright, fun room for our growing little boy, and hopefully a color that can stay for a while.  I'm thinking we should have it all painted by the end of the week, so I'll be sure to post some before and after pics!

Photobucket

Monday, February 14, 2011

Show & Tell: Trunk Love

I've been wanting this trunk for over a year and now I finally have it!  It was an early birthday gift from my parents.  I wanted it last year for my birthday, but refused to let my mom buy unless it was on sale.  I mentioned it 2 months before my birthday, thinking it would go on sale beforehand, but it never did.  It actually didn't go on sale one time until the end of the summer, so needless to say, I didn't get it.  About 3 weeks ago, to my surprise, I spotted it on sale in the Target ad for $20 off, and my birthday is just around the corner (in March)!!  Oh happy day!  Not only do I need the storage, but I love the way it looks.  Here is my beautiful new birthday trunk in action!!

See that gorgeous bedding in the background?  We bought it a couple months ago.  I was inspired by my favorite home improvement blog, Young House Love.  More on that later!


Photobucket

Wednesday, February 9, 2011

Another Party Idea

First, I somehow messed up my blog header this morning and need the hubby to fix it when he gets home tonight, so it will look like this the rest of the day.  Bummer.

Anyway,  here is another idea for Hudson's 2nd birthday party.  He is really in to Mickey Mouse at the moment, so I thought maybe a Mickey party would be fun for him.  I found these cute ticket style invitations at Fun Invites on Etsy.com.  If I got these, I would make the rest of the decorations myself.


I'm stilll leaning toward the space party idea, but I'm trying to explore all my options.
Photobucket

Tuesday, February 8, 2011

Birthday Party Planning

Even though Hudson's 2nd birthday isn't until April, I've already been thinking about party themes and decorations.  Today The Celebration Shoppe unveiled a new "space" design that I think is absolutely adorable!  I'm definitely adding this to my options!  Check it out!

She has so many great designs!!

I plan to share all the possible themes I find along the way, and if you have any suggestions I would love to hear them!

Here is where I'm linking up today:

Photobucket