Featured

Wednesday, May 30, 2012

Monster Party 3rd Birthday

Our little man turned 3 in April and we hosted a monster themed party this year. I wanted to buy clipart and design everything myself, but knew I wouldn't have enough time to finish it all before his party. For some reason March flew by and April was well under way before I realized his party was rapidly approaching!

I ended up ordering a personalized party kit from Your Printable Party on etsy.com. The kit came with everything and more! It was just the right colors and just the price. The entire kit only cost $29, and she personalized the invitations, cupcake toppers and banner! It was nice not to have to worry about doing everything myself, however, I did feel a little guilt about having created his first and second birthday party themes from scratch. I think I will for sure go back to designing my own again for his birthday next year, but this worked great too!

So without further ado, here is a look at Hudson's 3rd Birthday Bash.


The big balloons on the floor in this picture are actually punching balloons from the cheap toy end-cap at Target.


I did actually make this, well sort of, the designer provided the pennants and I added the photos. I made it just like I have for past birthdays. I picked my favorite picture from each month of the year and then put them in order starting with his birth month. It's a fun way to see how he changed over the course of a year!!


I made Cookies & Cream cupcakes from a recipe I found on Pinterest. I'll be sure to share it in a future post because they were pretty darn good. But if you can't wait, just click on the Pinterest button on the sidebar and it will take you to my boards.

The kit also included coloring pages which I really liked as favors for the kids, so I added them to the goodie bags.

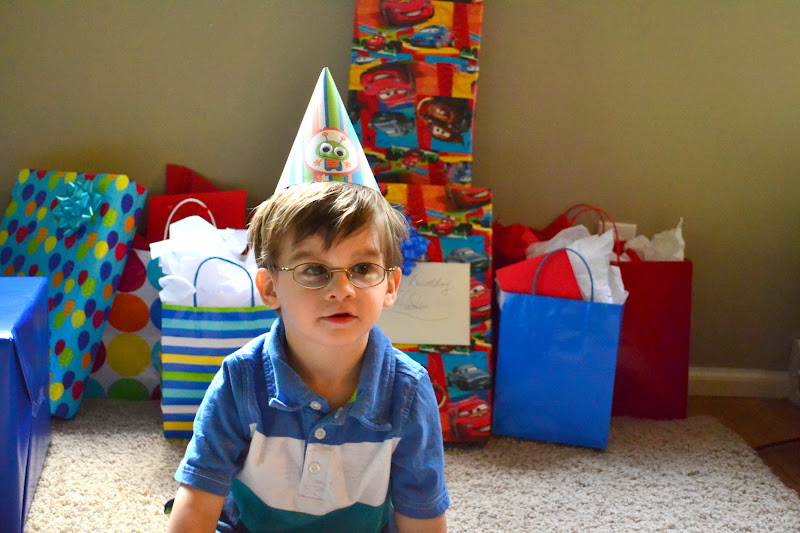
I decided to add an extra touch to Hudson's party hat by gluing on googly eyes. It was pretty cute!

This was the best family picture we got that day...not the best photo we've ever taken, but that's the way it goes with kids. And it's still a great moment frozen in time!

It was a fantastic party and most importantly, Hudson loved it!

I highly recommend Your Printable Party if your looking for cute, personalized AND affordable party decoration kits!

**Harper's first birthday is just around the corner and I AM designing her party myself. I can't wait to see how it turns out. The theme is mermaids!! It's so much fun to change things up a bit and throw a girly party! I'll be sure to post all about it!**


Photobucket

Tuesday, May 29, 2012

Recipe Time: Lemonade Cake

This recipe was really pretty simple and turned out great! I made it for a cookout we hosted over the holiday weekend and followed the recipe exactly. So perfect for summer!!


 I found the original recipe on Pinterest, but you can find it here on the Better Homes and Gardens website.

Lemonade Cake

Ingredients:

1/3 cup butter

3 eggs

2 1/4 cups all-purpose flour

1 teaspoon baking powder

1/2 teaspoon baking soda

1/2 teaspoon salt

1 1/3 cups sugar

1/4 cup frozen lemonade concentrate, thawed

1 teaspoon vanilla

1 1/4 cups buttermilk or sour milk

Yellow food coloring (optional)

Lemon Butter Frosting

Thin lemon slices (optional)

Directions:
1. Allow butter and eggs to stand at room temperature for 30 minutes. Meanwhile, grease a 13x9x2-inch baking pan; set aside. In a medium bowl stir together flour, baking powder, baking soda, and salt; set aside.


2. Preheat oven to 350 degrees F. In a large mixing bowl beat butter with an electric mixer on medium to high speed for 30 seconds. Gradually add sugar, about 1/4 cup at a time, beating on medium speed until well combined. Scrape sides of bowl; beat for 2 minutes more. Add eggs, one at a time, beating well after each addition. Beat in lemonade concentrate and vanilla. Alternately add flour mixture and buttermilk, beating on low speed after each addition just until combined. If desired, stir in a few drops of yellow food coloring. Spread batter into prepared pan.

3. Bake for 30 to 35 minutes or until top springs back when lightly touched. Cool in pan on a wire rack. Spread cake with Lemon Butter Frosting. If desired, garnish with lemon slices (slices should be removed before eating).

Lemon Butter Frosting
Yield: 2 cups Ingredients

1/3 cup softened butter

1 cup powdered sugar

1/3 cup frozen lemonade concentrate, thawed

1/2 teaspoon vanilla

3 cups powdered sugar

1 - 2 teaspoons frozen lemonade concentrate, thawed

Directions:
In a large mixing bowl beat softened butter with an electric mixer on medium speed until smooth. Gradually add the 1 cup powdered sugar, beating well. Beat in the 1/3 cup frozen lemonade concentrate and vanilla. Gradually beat in the additional powdered sugar. Beat in additional frozen lemonade concentrate to reach spreading consistency. Makes 2 cups.


Enjoy!

I'm linked up here:


Photobucket

Tuesday, May 1, 2012

Summer Family Fun List 2012

Last year I created a summer fun list for our family as a way to do all the things that we're always saying we're "going to do" and never actually get around to doing. It worked like a charm, even while I was 9 months pregnant, we were heading out for a picnic and picking strawberries! It was awesome! I was able to document most of the activities for the blog and for our Project Life album.

Since the list was such a success last summer, I decided I better make a new and improved version for this summer. I was able to include some new activities this summer because Hudson is a year older and able to participate in more activities.

So without further ado, I give you the 2012 Summer Family Fun List:

If you would like your own list you can download it for free HERE.


ENJOY!


*If you do download the file I would love a shout out and credit for my awesome creation.*

*Please note that this is for personal use only and may not be sold or reproduced for profit.*

I'm linking up here:


Photobucket

Friday, April 27, 2012

Who Loves New Recipes?!

Today I want to give a shout out to my good friend Melissa and her (along with her husband, Heeyoung) new food blog, H&M kitchen!


They love finding new and interesting recipes to try and share, as well as, adapting recipes to put their own spin on things and coming up with original recipes to share. Here are just a couple listed on the blog so far:

Prosciutto Wrapped Asparagus

Lemon Ricotta Pancakes
(I can't wait to make these!! Yum, yum, yum!)

On Saturdays they post a Simple Saturday recipe to help make cooking on the weekends that much easier. I already made this one for my son's birthday party and it couldn't have been easier:

Ravioli Lasagna

So, if you're a foodie or aspire to become one, hop on over to Melissa's awesome blog and check out all the other recipes she has to offer and don't forget to become a follower so you can check back daily!

Happy Friday!


Photobucket

Tuesday, April 17, 2012

Recipe Time: Pasta with Walnut Pesto

While I was browsing around http://tastykitchen.com/recipes/main-courses/pasta-with-walnut-pesto/ looking for some new recipes, I came across this recipe for pasta with a walnut pesto. I love walnuts and pasta and pesto! Plus, the directions were so simple. I pinned it to my recipe board on pinterest and made it a couple days later. It was so, so good! Even Hudson liked it! 

You can find the original recipe here.

Ingredients

1 pound Spaghetti


⅓ cups Olive Oil

1-½ cup Walnuts

½ cups Freshly Grated Parmesan

2 cloves Garlic

2 Tablespoons Lemon Juice

Kosher Salt To Taste

Finely Grated Parmesan And Toasted Walnut Pieces For Garnish


Preparation Instructions

Bring a large pot of salted water to a boil. Add the spaghetti and cook until al dente according to package directions.


To a food processor, add olive oil, walnuts, garlic, lemon juice and Parmesan and pulse until all the ingredients are combined. Season with kosher salt to taste.

Toss the walnut pesto with the pasta until the spaghetti is well coated.

Pile into bowl or a serving platter and garnish with finely grated Parmesan and crumbled toasted walnuts.


linking up here:


Photobucket

Friday, April 13, 2012

Five Spring Favorites

I've been bad about blogging lately. We've started to actually tackle some of things on our home projects list, so I've been keeping busy with that. Plus, we've had lots of family and friend get-togethers, which is awesome, but busy!

Right now we're in the process of switching Hudson into the bigger guest bedroom and moving Harper into his old room. The guest bedroom is bigger and fits his full sized bed much better. We bought paint for both room and yesterday I started the prep work to paint Hudson's room. His birthday party is next weekend, so I'm hoping to have his room finished by then. Fingers crossed!

Anyway, I digress. Today I thought I would share with you some of my favorite things so far this Spring.

1. Japanese Washi Tape
It's all the rage right now and I'm definitely on board! I've been using in in my Project Life and love the look it adds. I bought mine from Sugar B. Supplies on etsy.com.


2. The Hunger Games
I can't tell you how much I loved this trilogy! I thought the movie looked good, but I wanted to read the book before I saw it. I ended up reading all 3 books in a week!! Jeremy and I had a movie date last weekend to see it in the theater. Loved the movie too!


3. Kindle Fire
I got one from Jeremy and the kids for my birthday a couple weeks ago. I've wanted one for a long time! That's how I read the Hunger Games trilogy in a week! Awesome! The Kindle Fire is available on http://www.amazon.com/.


4. Awake
Jeremy and I were looking forward to this show starting about a month ago. It looked so interesting and different from anything on TV right now. It never disappoints! I recommend checking it out. You can watch old episodes on www.nbc.com.


5. Zen Habits
This is a website that emails out zen/meditation/relaxation subject related articles. They cover tons of different topics, but the articles always try to incorporate zen into your lifestyle. They are really good, relevant articles. Check them out at http://zenhabits.net/ to sign up.

P.S. They don't bog down your email either. Just a couple a week.

That's just a few of my favorite things. I could go on and on!

Well, I'm off to finish the paint prep work and start the process. I hope you all have a wonderful weekend!


Photobucket

Thursday, March 29, 2012

Easter Egg Garland

I've seen this garland over and over in blogland and love it. This version is from the ladies at eighteen25.


So, so very clever!

I finally got around to making one for myself. It didn't take more than 10 minutes and it was finished and hung! You gotta love a simple craft!

Here is my version:


I love it!


Photobucket

Wednesday, March 21, 2012

Playing Catch Up

I haven't been doing much crafting or major cooking lately. I've been spending most of my free time catching up on my Project Life album. I had to go back and pick out all the pictures that I wanted to use and mark them according to week and then load them for printing. We haven't replaced our ink cartridges yet, so I printed them at Target, which I must say, I'm super happy with. I had previously been printing at Walgreens because it's very close to our house and they always have a discount on prints, but the quality was horrible. I knew I didn't want poor, discolored photos for my Project Life, so I switched to Target. They cost a little more, but the quality is soooo much better and well worth the extra pennies!

Anyway, I've been going through and adding the photos and then adding journaling, keepsakes (such as receipts, mail, clothing tags, etc.) and embellishments. So far, I'm LOVING the outcome. I still have a ton more to do before it's all caught up, but I'm really enjoying the process! I'm also working on the current week at the same time, so it's been a lot of work! As soon as I get entirely caught up, I will be sure to photograph it all and have a big post. After that, I hope to post my weekly spreads as I go.

Here's a peek:

 (I apologize for the photo quality. It's been dark and rainy here all week, so I just snapped these quickly this morning.)

Oh, I did manage to FINALLY sew a set of curtains for Harper's room! They are far from perfect (and I actually did have a major screw up), but I'm so happy I completed my first sewing project! I still have to make the other set for the second window. I plan on finishing those up this weekend and then getting the hardware to hang them. So exciting! I would take a picture for you, but right now, they're folded up sitting on the ironing board and I think they will look much more impressive (maybe) when they're hung up.

*If you would like to learn more about Project Life check out http://www.beckyhiggins.com/.


Photobucket

Thursday, March 15, 2012

Pinterest Challenge Update

I finished my Pinterest Challenge project but haven't had the chance to order it yet, so I can't show you my finished product. I have the book design finished, but I don't have the book made yet and in my possession. I can show you where I got the idea though! This was my inspiration:


This awesome idea comes from Modern Parents Messy Kids. I'm sure you've seen it at some point on Pinterest. It's been a very popular pin.

Anyway, I figured now that Hudson is almost 3, this would be a great learning tool for him. He already knows most of his letters and can recite the alphabet, but I want him to learn to associate letters with words and what better way than to have a book full of images that he is either in or are of his own belongings?! Pure Genious!

I created mine with MyPublisher.com. I've used them before for our family yearbooks, and have always been really happy with them. Plus, they always have some type of promotion and I love a discount!

It was much harder than I thought to come up with words and pictures for all of the letters. I kept coming up with words for the same letters, but would get stuck on others. "N" for example for tricky for me...

I can't wait to get it ordered and in the mail. I will be sure to share it with you as soon as I get it!


Photobucket

Wednesday, March 7, 2012

Another Challenge!

Sherry from Young House Love and Katie from Bower Power are back with another installment of


Here was my Advent Calendar project for the fall edition:

 You can read more about that here.

And these were my little projects for the summer edition:

sponge balls for Hudson to play with in the pool
 
and some word rocks that I just thought were cool...but mine didn't turn out to be nearly as cool looking as the ones I pinned.
(p.s. I have no idea why I put Oprah on the quote rock when it was a quote from Ghandi. I must've had Oprah on the brain! Duh!)

You can read more on these projects here.


This time I want to take on a bigger project. So, I'm off to browse my DIY/Craft board to find something I really, really want to make! If you would like to follow me on Pinterest, just click the button on my sidebar.

I have a lot I would like to get accomplished around here this weekend. I keep saying that and it never happens, but this time I REALLY mean it!


Photobucket

Monday, March 5, 2012

Lucky Us

I wanted a little sign to go along with my St. Patrick's Day banners. We had some small pieces of plywood leftover from some other projects, so I used a small piece of that.

I used some of Hudson's craft paint to paint the wood white. It actually looks sort of white washed because you can still see the wood grain through the paint. And I'm okay with that. I actually kind of like the way it looks.

Once that was dry, I used some of my acrylic paint to write Lucky Us across the sign.

Then all I did was embellish it a little with a few of the same foam shamrock stickers that I used on my banner and now I have a cute little sign!


It's not perfect, but I like that about it. My favorite part is what it says!

Photobucket

Thursday, March 1, 2012

St. Patrick's Day Banner

I wanted to make a couple of St. Patty's Day banners to hang from the shelves above our tv this year. I've never really done much decorating for this holiday, but now that I have little kiddos, I feel the need to make every holiday as festive as possible. Festive, but tasteful.

While blog hopping one day I came across a beautiful banner made by Rebecca Cooper from
Simple As That.


So this became my inspiration. Then I remembered that I had these little foam shamrock stickers left over from a scrapbooking project. Perfect!

I like that they've got some sparkle. I also like that there are two different colors.

Here is what I ended up with. I was going to use white cardstock, but decided that I really liked the book pages to add a little more character.


I used twine that Jeremy had down in the garage. I think he uses it to tie branches and sticks together for the yard waste, but I'm loving it for this project and will for sure use it again!

It's very simple, but I'm really happy with how it turned out. Thanks for the inspiration Rebecca!

P.S. I hate these shelves and can never really figure out what to put on them. They're not very deep, so they don't hold much, but we needed to fill the space above the tv. I would've preferred to mount our tv on the wall, but at the time Jeremy didn't want to hassle with it. I think he's changed his mind since then. Maybe that will be a future project!


Photobucket