Featured

Monday, July 30, 2012

Busy Planning

We've been staying pretty busy around here lately. We've had friends and family in town, our basement bathroom finally got finished (more on that later) and we've been trying to get out and about with the kids as much as possible given the terrible heat wave that hit us last week.

I've also been making some big plans involving the holidays. Yep, that's right, I'm already planning for Christmas. I'm starting early this year because it seemed like it was upon us so fast last year that I felt pressed for time. Now that I'm sewing, well maybe I should say learning to sew, I'm planning a few handmade Christmas gifts as well as some awesome pillow cases for the kids, which will probably take me at least 4 months to make! Ha! Anyway, I wanted to give you a sneak peak at a few of the things I'm planning to make.

Booster Seats
I am actually planning to make these before Christmas. I found some cute vinyl tablecloths on clearance for $2.50 at Target a few weeks ago, so this is my next project.
tutorial found here

 Coasters
I'm loving these diy coasters from Martha Stewart. The colors are awesome! I think these would make a great hostess gift!
tutorial found here

Hand Warmers 
I think these would be perfect for keeping little hands warm while playing outside. Hudson went sledding for the first time last winter and I know he'll be all over that again this year. I always worry that he won't tell us if he's too cold, but with a couple of these, at least his fingers will be warm!
 
tutorial found here

Painted Utensils
I love the colors on these utensils and think it's a great way to personalize and jazz up what is kind of a boring gift. I want some of these for myself, but I'll have to wait, because I know someone else who would like some too!
tutorial found here

Beauty Scrubs
I adore scrubs of any kind. Who knew they were so easy to make yourself?! I didn't until I found a little website call Pinterest where I came across a ton of different recipes! I think these will make great inexpensive gifts for my girlfriends.
 
tutorial found here

Quilted Christmas Pillowcases
And this is my BIG project that I've already started preparing to make for the kiddos! I think this is so beautiful! I have absolutely no idea how to quilt, but I'm willing to give it a try if this is the end product! I hope to have these finished by December 1st so that the kids can use them all month. Harper doesn't sleep with a pillow yet, but at least she can have one for the future.
 
original post here

I found all of these ideas on www.pinterest.com. LOVE that site so much!

I have a ton of other ideas floating around my head too. I was thinking a diy play kitchen for Harper and a desk for Hudson's room. Of course, I would need to get the hubby on board for helping with those projects, so we'll see what I can figure out!

Is anyone else thinking about Christmas already? It's kind of hard not to when so many of the blogs and online shops are hosting Christmas in July!

Are you planning any handmade gifts this year? I'd love to hear about them!


Photobucket

Thursday, July 12, 2012

Summer Pinterest Challenge

I know I'm a little late to the party, but I just finished my Pinterest Challenge project last night.


I've been wanting to make a Minky blanket for Harper (I'm sort of hoping she'll get attached to it so that she'll have something to comfort her) and found an awesome tutorial put together by Jenny at http://icraftblog.blogspot.com/! She has great, easy to follow photos and instructions.

I had never sewn a blanket before, actually the only two items I've ever sewn were some boxer shorts in junior high Home Ec and then I recently finished curtains for Harper's room, and was really intimidated. But I figured why not give it a try anyway. I mean, what's the worst that could happen?

I did it!!


 I found this awesome fabric on www.etsy.com. Isn't it just so pretty?! I adore the colors!

 It measures about 17 inches wide and 25 inches long. I used one of Hudson's lovey blankets as my size guide. I didn't want a big blanket. I wanted one that she would be able to drag around with her.

For the back side, I used a white Minky fabric. I hope it doesn't get too stained! I could have picked a color, but I really wanted the patterned side to pop.

Since I used white Minky, I thought is would look best if I used white thread as well. I really wanted it to look good!

I absolutely LOVE it!

It turned out SO much better than I thought it would given my sewing skill level. I'm so happy with it, that I just might have to knock out a few more!

Even if it wouldn't have turned out as good as it did, I still would've loved it just the same. It's so much better making something special for someone than buying it. I think she'll love it even more someday when she understands that I made it.

Cost breakdown
This blanket only cost me about $8.50 to make, much less that if I would've bought one!

1/2 yard scalloped fabric-$5 from etsy.com
1/2 yard white minky fabric-$3.50 using a 50% coupon at JoAnn
I already had the white thread


Winter Pinterest Challenge Update: I still have Hudson's alphabet book sitting finished on my MyPublisher account. I haven't forgotten about it. I've been waiting for a big sale. The shipping on those books alone is $10 and I really don't want to spend $30 on such a small picture book. I'm considering redoing it on another site. Maybe snapfish? I'm open for suggestions! Once I finally order and receive it, I'll definitely be sure to post photos.


Photobucket

Wednesday, July 11, 2012

Right Now Around Here


watching The Walking Dead, season one on Netflix (so, so good!)

eating Better Oats blueberry muffin oatmeal topped with half a sliced banana and a few chopped walnuts (it's my new favorite!)

reading The Seven Spiritual Laws of Success by Deepak Chopra

looking forward to our 5 year anniversary trip to Big Sur next month

enjoying summer and crossing activities off our Summer Family Fun List

preparing for The Color Run this Saturday (I haven't been running at all because our basement flooded and everything, including our treadmill is sitting in our garage waiting for the new carpet to be installed)

loving that Harper has started walking

sewing a lovey blanket for Harper (using a tutorial from Pinterest)

learning as much as possible about photography

drinking tons of water

focusing on losing some of that pesky baby weight that keeps sticking around. Sigh.

wrapping up Harper's bedroom redo (will post photos soon!)

obsessed with my Project Life album and making it perfect (so much fun and rewarding!)

wishing the weather would cool off just a little

needing to learn photoshop, but feeling intimidated

using my silhouette machine more for projects

starting a yoga class

photographing everything, especially the kids


Photobucket

Tuesday, July 3, 2012

Craftaholics Anonymous Summer Gift Exchange 2012

I've always wanted to participate in The Craftaholics Anonymous Gift Exchange and finally signed up this round. She does two gift exchanges per year; one in the summer and another around Christmas. I had so much fun doing this exchange that I think I'll sign up for the holiday exchange as well!

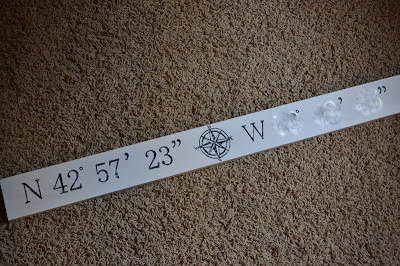
I just mailed out my gift last Saturday. I knew when I signed up that my goal was to make as personal of a gift as possible. Then I remembered that I had pinned a latitude and longitude address sign from etsy.com and I knew that was the perfect gift! And now that I've made one from my giftee, I'll definitely be making one for myself next! I am so happy with the way it turned out! I just hope that Barbara likes it as much as I do!


I hand painted the numbers, but traced a stencil to make sure they would look extra crisp.

I wanted it to look a little weathered, so I used the dry brush technique with just a small amount of white paint.

I used a compass rose symbol that I found on Google images. I think it adds that special something.


(I blurred out some of the coordinates for her privacy)

I received my gift in the mail yesterday all the way from Jessie in Florida. She made me some pretty little bracelets! Very thoughtful! Thanks Jessie!

I really like how this one looks ombre. So cool!

Both the kiddos are loving this one!

The gift exchange was lots of fun! If you've never done it, I would definitely recommend joining the fun!

Thanks for hosting such as awesome event Linda!!


Photobucket

Tip Junkie handmade projects

Monday, July 2, 2012

Summer Captured 2012:Update

I recently posted about how I wanted to document our activities that we cross off our Summer Family Fun List (you can find that post here). I decided to call my project, Summer Captured 2012. Well, we've already crossed quite a few activities off our list and are having so much fun doing it! I also began working on the inserts for my Project Life.

I mentioned how I was going to document the activities in a previous post which you can check out here. I'm using the instagram app on my iphone in order to have 2x2 photos, as well as the ability to use the filters on the photos. I wanted to use 2x2 photos so that they would fit into a plastic page made for displaying coins. I also planned to add a card with just a little bit of journaling about each activity.

I printed a bunch of the photos the other day. I plan to print as we go, maybe after every few activities. When I planned to add the 2x2 journaling card I was orginally just going to cut a bunch of white cardstock to size, but decided I wanted something a little more colorful and fun. I searched etsy.com and came across some digital chevron scrapbook paper for $3.00, so I bought the file. It included around 24 different colored patterns, three variations of each color. I used one of each color, which I think totaled eight different colors. I made my patterned journaling cards using Word. I use Gimp for a lot of my memory keeping tasks, but I knew it would be really simple to create the squares using Word.

It didn't take me long. Once I printed the pages, I used my fiskers paper cutter to cut them down to size. After that I organized them, added my journaling and put them into the page pockets. Here is a look at how the inserts are coming along so far.

I'm adding the activities in the order that we cross them off our list. Page one is full and I've already started adding some to the back side as well.


Here is a close-up of the orange chevron card;

 The hot pink chevron;
The purple chevron;

I really like how it's turning out! I think it will be so great to look back at this when the kids are grown and remember all the fun things we did as a family!


Photobucket