Featured

Showing posts with label DIY Ideas. Show all posts

Tuesday, October 23, 2012

Rice Heating Pad Gifts

Last month I decided to make both my parents rice heat pads for their birthdays. My mom's birthday is in September and my dad's is in October, so I figured they would be the perfect gift for the cold weather that's on its way.

I found a great tutorial from The Green Wife on Pinterest.(Be sure to check it out!) It was easy for a beginner like me to follow. I followed every step with the exception of the the step where she sews her sections. Since I'm still learning and not a great sewer, I tried to sew 6 sections in my dad's, but only managed 5 and then I only sewed 3 large sections in my mom's. Sewing the sections was the hardest part, because you have to add the rice and then pin off the section and sew. I could not, for the life of me, sew a straight line along the pins!! UGH...

Oh, and I also didn't serge the edges like she does. I just sewed them with a 1/4 inch seam allowance.

And I didn't buy flannel fabric (because I didn't read that part before I bought my fabric), but I did line both warmers with a layer of white flannel to help keep in the heat in longer.

I snapped a few pictures of my dad's heating pad, but I didn't get one of my mom's before I gave it to her and then she left our house before I remembered to take any. Darn it!

It's definitely not the best looking rice heating pad ever. Not even close, but it gets the job done!
My dad is a die hard Nebraska Cornhusker fan, hence the Husker fabric.


I put this one through a few test runs and it worked great! My dad has a bad neck, so he's used his a few times and loves it! Yay for useful, handmade gifts!!


I also thought the heat pads would be great for heating up the end of the bed before they climb into it on those freezing cold winter nights.

I bought some pretty flannel fabric to make one for myself too, but still haven't gotten around to making it. Go figure! And I need one desperately!

My next sewing project is a quilted Christmas pillow case for each kiddo. I've already bought the fabric, but need to cut the pieces and then learn how to put it all together. Yeah, that should be interesting. But I did pin a fantastic tutorial on Pinterest, so we'll see if I am smart enough to figure it out!


Photobucket

Friday, August 17, 2012

Booster Seat Complete

I just finished my third sewing project! I'm so proud of myself for taking the plunge and trying something new, especially because I'm very intimidated by my sewing machine!

A few posts ago I talked about some of the projects and homemade gifts that I wanted to get started on early this year. One of the projects was to make Hudson and Harper booster seats for the kitchen table. Actually, Harper won't need one for a while yet, but I figured while I'm making Hudson's, I might as well make Harper one too.

I was inspired by this tutorial that I came across on www.pinterest.com. They looked pretty simple, but since I'm new to sewing, I had no idea how they would turn out.

The goal:


My completed booster seat:


It looks like the one above, right?!

It's nice and thick.

I did it! The tutorial was easy to follow along for a beginner like me. I didn't have any trouble understanding the steps. I was nervous, but it was really easy! The hardest part was getting the tablecloth cut to the right dimensions...well that was probably because my kiddos were trying to climb all over it while I was cutting!

In case you're wondering, I bought my vinyl tablecloth at Target on clearance a few weeks ago for $2.50. I like the pattern and the colors, but wish they would've had something with stripes or polka dots. Oh well, I guess this will add a little bit of summer to our house all year round! Maybe next summer they'll have something I like better and I can make some more.

If you would like to make your own booster seats, head on over to http://smashedpeasandcarrots.blogspot.com. It's a great tutorial!

I'm so happy with my completed booster seat! The more I sew, the less intimidated I am and the more I enjoy it!

Happy Friday!


Photobucket

Thursday, March 15, 2012

Pinterest Challenge Update

I finished my Pinterest Challenge project but haven't had the chance to order it yet, so I can't show you my finished product. I have the book design finished, but I don't have the book made yet and in my possession. I can show you where I got the idea though! This was my inspiration:


This awesome idea comes from Modern Parents Messy Kids. I'm sure you've seen it at some point on Pinterest. It's been a very popular pin.

Anyway, I figured now that Hudson is almost 3, this would be a great learning tool for him. He already knows most of his letters and can recite the alphabet, but I want him to learn to associate letters with words and what better way than to have a book full of images that he is either in or are of his own belongings?! Pure Genious!

I created mine with MyPublisher.com. I've used them before for our family yearbooks, and have always been really happy with them. Plus, they always have some type of promotion and I love a discount!

It was much harder than I thought to come up with words and pictures for all of the letters. I kept coming up with words for the same letters, but would get stuck on others. "N" for example for tricky for me...

I can't wait to get it ordered and in the mail. I will be sure to share it with you as soon as I get it!


Photobucket

Wednesday, March 7, 2012

Another Challenge!

Sherry from Young House Love and Katie from Bower Power are back with another installment of


Here was my Advent Calendar project for the fall edition:

 You can read more about that here.

And these were my little projects for the summer edition:

sponge balls for Hudson to play with in the pool
 
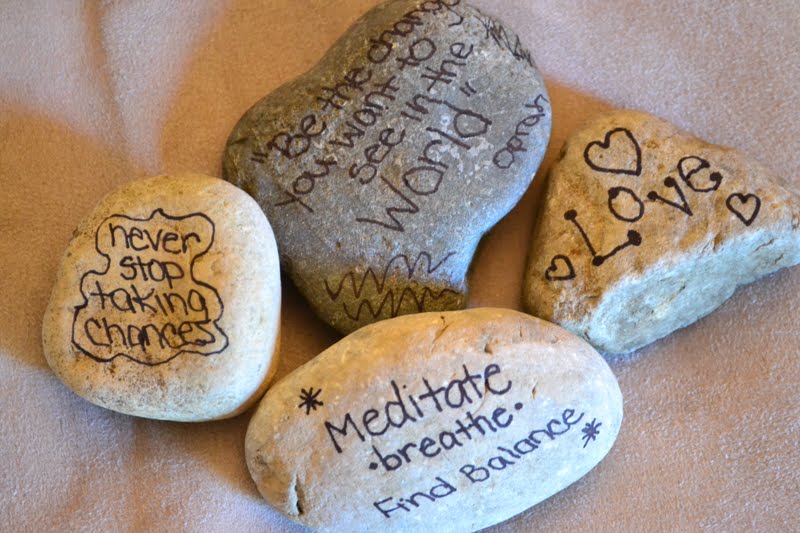
and some word rocks that I just thought were cool...but mine didn't turn out to be nearly as cool looking as the ones I pinned.
(p.s. I have no idea why I put Oprah on the quote rock when it was a quote from Ghandi. I must've had Oprah on the brain! Duh!)

You can read more on these projects here.


This time I want to take on a bigger project. So, I'm off to browse my DIY/Craft board to find something I really, really want to make! If you would like to follow me on Pinterest, just click the button on my sidebar.

I have a lot I would like to get accomplished around here this weekend. I keep saying that and it never happens, but this time I REALLY mean it!


Photobucket

Wednesday, November 30, 2011

Advent Calendar

**Updated**

I've been working very hard at finishing all my projects before December 1st, and I finally finished the advent calendar envelopes the other night and then the activity cards yesterday. Boy, was it more work than I anticipated, but I love how they turned out.

I actually ended up finding some scrapbook paper from the same holiday set that the paper I used, so that way I was able to add more to the fronts of the envelopes. I also bought some of the Martha Stewart holiday baker's twine at Michael's to add to them.

After I was finished with the envelopes, I had to type up all the activity cards, print and cut them. That part took more time than it should have due to all the breaks for diaper changes, making food, filling juice cups and feeding the baby.

Here is a peek at my finished project. Sorry it took me so long!


If you remember, this is what I started with:

Library cards and envelopes cut with my Silhouette machine using white card stock.

A super cute sheet of advent scrapbook paper purchased last year at Archiver's. I saw that they have it this year too though!

I cut up the scrapbook paper into the numbered pieces and glued them to the envelopes. They still needed more embellishment in order to be complete.

So, I found another piece of scrapbook paper from the same set, cut that up and added baker's twine to most of them.

This card originally just had the square with the number nine on it. It was way too plain, so I cut the phrase merry & bright from the matching paper and added some twine. Much better!


Once I was finished with the envelopes, I started a list of all the activities I wanted to add and got started on the cards. I made them really fast using Word. The font is honey script.

Each card has a different activity for that day. I included everything from a picnic by the tree to doing a random act of kindness, such as paying for the person's order behind me in the drive thru. I also included a few "special surprise" cards to indicate that the kids get a small gift that day. It should be lots of fun!

I absolutely LOVE the way it turned out!


I'm glad I didn't end up using that paper last year, because it was my inspiration for the calendar this year.

I haven't found the perfect spot to hang it yet, so at the moment they are all in an apothecary jar in our living room. It actually looks pretty, but I need to find a place where I can hang them and admire all my hard work!

When I do hang it, I'll be using some type of ribbon or heavier twine and clothes pins.

Linking up here:


Photobucket

Monday, August 8, 2011

Homemade Finger Paint

This is actually another Pinterest project.  I pinned a recipe for homemade finger paint a while back and finally tried it last week.  However, my first attempt did not turn out well.  The recipe that I pinned didn't include much detail, so I was just kinda winging it.  The paint I ended up with was waaaay too thick...who am I kidding, it didn't even remotely resemble paint.  It was like Jello.  I was determined though, and decided to try it again this morning.  This time it turned out perfect!

Recipe
2 cups water
1/2 cup corn starch
3 tbsp sugar
1 tsp salt
food coloring

Directions
Mix water, corn starch, sugar and salt in a small saucepan and warm over low heat letting mixture thicken.  The mixture tends to thicken on the bottom of the pan first, so be sure to stir it often!  The heating process took about 15 minutes. The consistency should resemble ketchup when you remove it from the heat.  Let cool, but stir occasionally while cooling.  The mixture seems to thicken more after removing from heat.  Once it's cooled, divide into small airtight containers and add desired food coloring. I used baby food jars this time, but would like to buy some better containers for the next batch.

Ingredients

Here is what it looks like then you start.

 I took this pic just before removing it from the heat. You can see that it's sticking to the wisk.

 And here is the final product after adding food coloring.

 It's so pretty!

Hudson hasn't gotten to paint with it yet because he fell asleep.  I can't wait for him to wake up and try it out.  Hopefully when I take the lids off and stir it up a little it will still be thin enough to paint with!  I will let you know, but so far so good as of right now!

P.S. I think my photography skills are getting better everyday.  What do you think?


Photobucket

Wednesday, August 3, 2011

Finished Pins A Day Late

I tried to get on the computer yesterday to post my finished Pinterest projects, but with 2 kiddos under 2, I don't always get to do the things I want to do! Sorry about that! However, I'm here today with 2 of my projects completed. 

First, I made some of those adorable sponge balls.  I've seen some different variations on some of my favorite blogs, but here is how I made mine.

I bought some regular sponges for $2.69 at Target.

 Then I picked up some cable ties at Ace Hardware for $2.50.

 I used scissors to cut the sponges into strips, cutting the length of the sponge.

 The finished project.

I ended up with 2 balls from a package of 6 sponges.

 I just think they are so adorable!  Hudson couldn't wait until we went swimming to use them...he had to play with them in the bathtub last night.

It was a very cheap project and a fun pool toy for Hudson.  Win, win!!

For my next project all I had to do was go out to the backyard to get my supplies.
I picked out some rocks from our landscaping and brought them in to wash.
Then I used a Sharpie, which I already had on hand, to write messages.


I love them! Now I need to pick up a dish to display them.
You can't beat a free project!
I only made 4 for now because I plan on it being an ongoing project. 

As for the tissue balls that I was going to make, I decided on a different mobile to hang above her changing table.  I found my inpiration on Pinterest for the new mobile too, so now I just need to pick up my supplies.  I plan on working on that this weekend.

Photobucket

Wednesday, July 27, 2011

Pinterest Challenge

One of my favorite blogs is Young House Love, I follow it religiously, and yesterday they posted a Pinterest Challenge since it has become the new Internet sensation these days.  Katie from Bower Power, Emily from Style by Emily Henderson and Lana from Making a House A Home are also in on the fun and they've invited anyone with a Pinterest obsession to join in too. 

The idea is to challenge yourself to complete one DIY project that you've pinned on Pinterest and have it done by next Tuesday.  Since I love a challenge and could use some type of creative outlet, I've picked out a few small projects to try my hand at this weekend.  I figured if I start small then there's no where to go but up!  So here are the projects I'll be tackling this weekend and sharing with you on Tuesday.

1. A fun toy for Hudson to play with in the pool.  I think these are so adorable!

 2. A little inspiration for me.

 3. I've been wanting to make some of these to use as the mobile in Harper's nursery above her changing table.

These are all very simple projects, so hopefully I can get them all completed and start enjoying some of my pins instead of just staring at them!

Photobucket