Featured

Thursday, June 28, 2012

All About The Kids: Outside Soup

It's SOOOOO hot and humid here right now, but I'm still trying to get the kids (especially Hudson) outside for a least a little while everyday. I've been pinning ideas on Pinterest and just browsing blogs for simple ideas that don't require too much energy. I've also been trying to think back to when I was a kid to remember the creative/imaginative things we would come up with when we were bored.

One of my memories involved making "outside soup" or "nature soup" using everything we found in the yard. We would fill a bucket or bowl with hose water and wander the yard in search of ingredients. It would entertain us for hours. We would make a soup play for a while, dump it out and make a new soup. So much fun!

I figured that it would be a fun activity for Hudson to do this morning while Harper was taking her morning nap before if got too hot outside. We filled his bucket about 1/4 way up with water and then went searching for as many different "ingredients" as we could find in our backyard.

Here is a list to give you an idea of what could be added, but the list could go on and on depending on your surroundings. So many possibilities!

Outside Soup Ingredients
twigs
grass
leaves
dirt/mud
acorns
pinecones
clovers
dandelions
pebbles
bark
wild strawberries
(We have some of these growing in our yard. Bad for our yard, but awesome for outside soup!)
flower petals
moss
crabapples
seeds

Hudson had so much fun hunting around, adding and stirring the ingredients! We left it outside in the sun to "cook" and he goes out to stir it every couple hours. I tried to incorporate as many different things as possible, as well as, tried to make it as colorful as possible. It was even kind of fun for me and brought back a lot of memories!


So there you have it! A simple outdoor activity to keep those kids busy and keep their imaginations working!


Have a great weekend and stay cool!


Photobucket

Thursday, June 21, 2012

Fireworks In A Bottle

Once again I've been inspired by a project that I found on Pinterest. Big surprise, I know, but there are so many great ideas floating around out there!

I give you, Fireworks In A Bottle!


This project is all about the kiddos. I love all the sensory bottles I find on Pinterest and thought the kids might like them too. They're basically homemade snow globes using items that you have on hand, such as plastic bottles, beads, glitter, ribbon, confetti, etc. I have a couple different ideas pinned, but since the Fourth of July is just around the corner, I knew I wanted to make my own version of these from No Twiddle Twaddle:


I already had plastic water bottles, red ribbon, white ribbon and silver glitter on hand, but wanted to pick up some blue ribbon and some star confetti. I loaded up the kiddos and we took a trip to Michael's. When I got there I came across a whole 4th of July section and they had some awesome glittery red and blue ribbon for 30% off, so I picked up a roll of both colors. I also grabbed some silver star confetti. Then on the way home, I decided that I didn't want to use the water bottles I had on hand. I wanted to use the square Fiji water bottles, so we stopped at the gas station to get a couple bottles of water. I didn't mind spending the extra couple bucks because Fiji water is my favorite and I was thirsty anyway!

Once we were home, we got to work. First I cut up all different sized ribbon strips. Then I grabbed the rest of the supplies:

red glitter ribbon (Michael's)
blue glitter ribbon (Michael's)
white ribbon (already had on hand)
silver star confetti (Michael's)
silver glitter (already had on hand)
Fiji water bottles
super glue


 Then it was time to fill the bottles with all the goodies.

 Once we were done filling the bottles with "fireworks", I filled them up with water. Oil would work better for keeping the glitter and confetti swirling longer after shaking, but I didn't have any on hand.

Once the bottles were filled with water, I used super glue to seal the lids on to ensure no spillage.

Fireworks In A Bottle!!

Each kiddo has their own bottle of fireworks.


Hudson thinks it's pretty cool! He had lots of fun putting everything in the bottle.

He has a fascination with fireworks and makes all kinds of "firework" sounds when he shakes it! It's kind of funny!

One thing I noticed about the water though (that was also mentioned here on No Twiddle Twaddle); it does start to turn a little pink from the color bleeding off the ribbon. If you took the time to pre-soak the ribbon it might not bleed, but this was supposed to be a quick, easy project, so I wasn't too worried about it. It doesn't bother me..okay, it bothers me a little, but not enough to make new ones! Ha ha!

This was a fun project! I even liked making one! Plus it's a safe way for kids to play with "fireworks"!

Has anyone else made any 4th of July projects or crafts?

I still have a couple more things I want to make before the holiday arrives. We'll see if I have enough time!


Photobucket

Monday, June 11, 2012

Road Trip with Little Kids

About a month ago we took our first long road trip family vacation. We drove down to Dallas to visit some family and just get away for a few days. It was the longest road trip we've taken since having Hudson three years ago. When he was about 13 months, we took a mini vacation to Minneapolis, but we worked out a way to shorted our time in the car by stopping in Sioux Falls to stay the night with my parents on the way there and the way home, so we only ended up being in the car for about 4 hours.

Dallas is around a ten hour drive from Omaha, but when you factor in stops for potty breaks, diaper changes, stretching and eating, it can easily turn it into a thirteen hour drive. I was extremely nervous about being in the car that long with a 3-year-old and a 11-month-old. Hudson was never good in the car as a baby. He would cry non-stop. Once we got a TV in the car, the crying started to ease up and he does much better now. (I always said I wouldn't be one of "those" parents that just puts a TV in front of their kids to keep them quiet, but now that I am a parent and realized how well it works and that sometimes it's the best I can do, I totally have become "that" parent. No judgements please...) Anyway, Harper does pretty good in the car most of the time, so I wasn't too worried about her.

We picked a date and made the plans. We decided to make a stop over on the way to Dallas. We figured it would work best to leave in the late afternoon and stay in a hotel somewhere in between in hopes that the kiddos would get in some sleep time in the car.I was excited to get out of town, but first things first, I needed to find some ideas for entertaining the kids and keeping them happy.

The first place I looked was Pinterest. I had seen some pins geared toward kids and road trips, so that's what I searched. I got some pretty great results including one that turned out to be a total lifesaver! Jordan over at The Fun Cheap or Free Queen has some really awesome tips!!

The BEST tip for me that she blogged about (that never crossed my mind) was making a trip to the dollar store or dollar section of Target before the trip and buying a bunch of "presents" for the kids to open in the car. You can read her entire post here. She even wrapped them in old wrapping paper she had on hand. I thought this idea was BRILLIANT! That was exactly the type of thing I was looking for. Hudson is sort of at that in-between age of not being a baby anymore, but not totally a big kid either, so I wasn't sure how I was going to keep him from having meltdowns. This was it!

I went to the Dollar Tree and picked up some fun things that I knew would be easy to play with in the car and then went home and wrapped them in some leftover birthday wrapping paper. Once we were in the car, I showed Hudson the bag of presents and told him that he would keep getting presents as long as he was being a good boy. It worked like a charm. We gave him the first present about 2 1/2 hours into the trip and then every 2 hours or so, depending on his behavior. He NEVER asked for a present the entire time, but got really excited every time he got to open one. It was awesome!! Here is a look at a few of the presents he got on the way down:

Oh, and I also picked up this Franklin DVD for $5 at Target so that Hudson would have something new to watch to keep him occupied. It's 3 hours long!! He had never really watched Franklin before, but liked it a lot.

I found a "girl" version and "boy" version of those cute stuffed caterpillars. (Side note: Hudson gets really attached to new stuffed animals when he first gets them and he loves bugs, so I knew we had to have these.) I was right, he loved it. See the photo below. Then I picked up a coloring book, a water gun for the pool once we got to Texas, a new Hot Wheels car and some glow necklaces, as well as a glow wand (not pictured) to use when it got dark out and we were still in the car.
(I took this picture after we got home and I think I'm missing something, but cannot figure out what it is)


Then the night before our drive back home, Jeremy and I went to Target and grabbed some more dollar toys for the drive home. We didn't buy anything that cost more than $1, so I think we ended up spending $10 on both kids on the way down and $10 for the drive home. Totally worth it for us!! It eased my mind and helped to make the trip much more enjoyable for everyone. There were NO tantrums or meltdowns at all! Amazing!

I was okay with spending a little money on the "presents" because our kids didn't really get anything else on the trip as far as toys. They each got some new clothes and Hudson got a $5 ball game from Old Navy to play with while we were there and a race track mat from Ikea to take home, but that was it. We definitely don't spoil our kids with toys. If you don't want to give your kids toys, you could always try educational "presents" or a punch card of sorts where they get punches to earn a special something.

Jordan has some other great tips too, such as, putting a basket of coloring books, games, etc. in between the car seats so they can be easily accessed by the kids and packing lots of nutritious and delicious snacks and drinks ahead of time so you don't have to stop a bunch. She also mentions pre-filling sippy cups so you don't have to pour in the car, which is something we always do for any road trip. It makes things so much easier!

I spent a lot of time planning ahead to try to ensure a smooth trip and it payed off.

Anyway, if you're looking for more ideas, I definitely recommend checking Pinterest. There were lots of other websites/blogs that I didn't even get a chance to look at.


All in all it was an awesome trip! We needed the break so badly and it turned out to be lots of fun! Here are just a couple pics of the kiddos in the pool.


Photobucket

Friday, June 1, 2012

Documenting Our Summer Fun=Summer Captured 2012

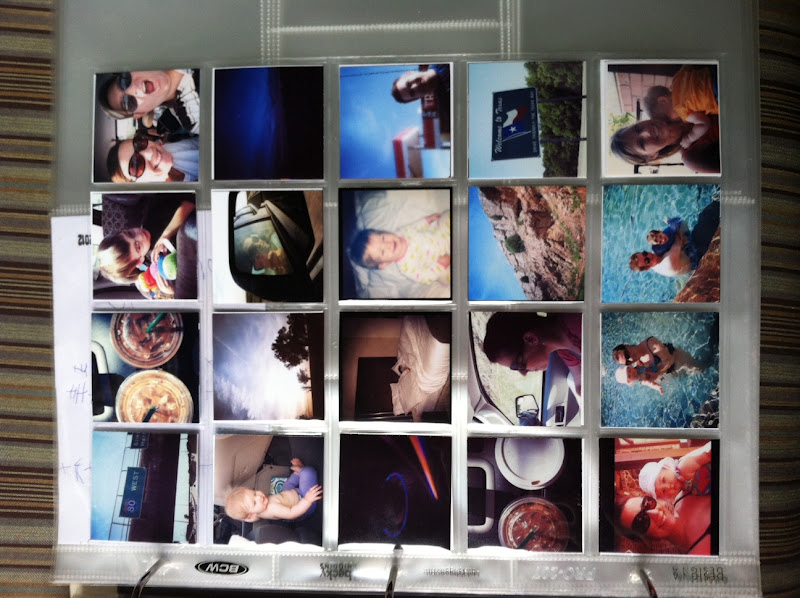
I had an idea about a special way to document the activities that we actually cross off of our Summer Family Fun List. I want to be able to incorporate a special insert(s) into my Project Life album. I was inspired by this insert idea from Elise over at http://eliseblaha.typepad.com. She used a coin pocket page purchased from amazon.com to display all her instagram vacation photos.

photo source here

So Genius! I went straight to amazon to order some of my own! They hold 20 photos in the front and 20 in the back side, which I also thought would be perfect for this project. This is what they look like:


I've already used one page to display our family vacation instagram photos and it's probably my favorite page so far! Here's a look:

Looks pretty cool, right?! I think so too!

My next source for inspiration comes from Marcy Penner over at http://www.marcypenner.com/?p=7224.
She used the same concept to document Day In The Life this year, only she made her own pocket page by sewing one out of a 12x12 page protector in order for it to fit her Project Life album. I really love how she alternated between an instagram photo and a small journaling card in order to add words to her photos. Take a look. Love it so much!

So, my idea is to fill up three 20 pocket pages using the fronts and the backs. I plan to alternate an instagram photo of each activity and a small journal card detailing the fun we had. Our list contains 50 different activities, so in all I'll need 100 pockets, which will take up 2 1/2 pages leaving just the back side of the third page empty. I decided that I can either fill up the back side with some pretty patterned paper, one giant photo cut up to fit the squares or, if we end up adding more activities to the list, I will have room to incorporate those into the spread as well.

This seems like such a great way to not only document each activity, but also to make us more likely to complete the entire list, which is all about having FUN together and focusing some attention on family time. I may even print out another copy of the list and insert that into an 8 1/2 x 11 page protector and add that in the same spot. I have a lot of ideas flowing! I do know for sure that we plan on tackling one of the activities this weekend, so I think I'll add the inserts in between the first week of June spread.

I can't wait to see how it turns out! And if any of you are fellow Project Life junkies like me and you want to join in the fun, I would love a link to check out how you plan to document all your summer fun activities! Just leave it in the comments section or send me an email!

I think I'll nickname this project Summer Captured 2012, hence the blog title.

I'll be posting updates as I add to my pages.


Here's to a fun-filled summer full of family and of course photos!


Photobucket

Wednesday, May 30, 2012

Monster Party 3rd Birthday

Our little man turned 3 in April and we hosted a monster themed party this year. I wanted to buy clipart and design everything myself, but knew I wouldn't have enough time to finish it all before his party. For some reason March flew by and April was well under way before I realized his party was rapidly approaching!

I ended up ordering a personalized party kit from Your Printable Party on etsy.com. The kit came with everything and more! It was just the right colors and just the price. The entire kit only cost $29, and she personalized the invitations, cupcake toppers and banner! It was nice not to have to worry about doing everything myself, however, I did feel a little guilt about having created his first and second birthday party themes from scratch. I think I will for sure go back to designing my own again for his birthday next year, but this worked great too!

So without further ado, here is a look at Hudson's 3rd Birthday Bash.


The big balloons on the floor in this picture are actually punching balloons from the cheap toy end-cap at Target.


I did actually make this, well sort of, the designer provided the pennants and I added the photos. I made it just like I have for past birthdays. I picked my favorite picture from each month of the year and then put them in order starting with his birth month. It's a fun way to see how he changed over the course of a year!!


I made Cookies & Cream cupcakes from a recipe I found on Pinterest. I'll be sure to share it in a future post because they were pretty darn good. But if you can't wait, just click on the Pinterest button on the sidebar and it will take you to my boards.

The kit also included coloring pages which I really liked as favors for the kids, so I added them to the goodie bags.


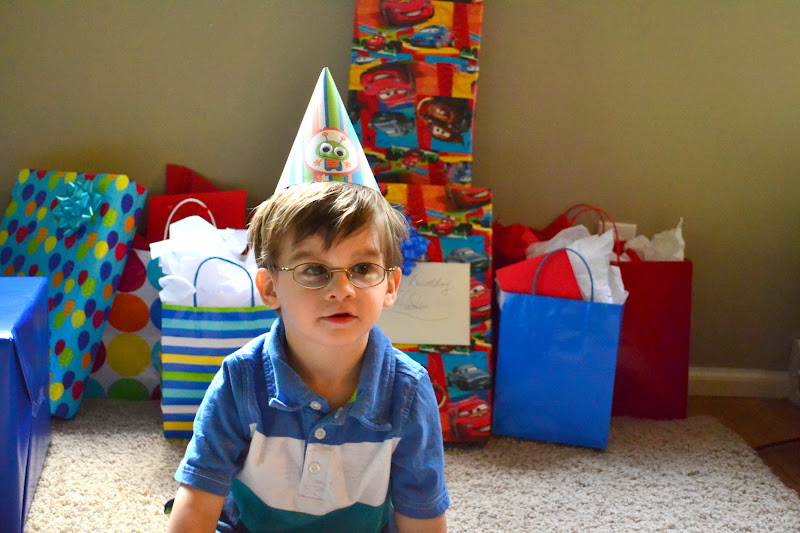
I decided to add an extra touch to Hudson's party hat by gluing on googly eyes. It was pretty cute!

This was the best family picture we got that day...not the best photo we've ever taken, but that's the way it goes with kids. And it's still a great moment frozen in time!

It was a fantastic party and most importantly, Hudson loved it!

I highly recommend Your Printable Party if your looking for cute, personalized AND affordable party decoration kits!

**Harper's first birthday is just around the corner and I AM designing her party myself. I can't wait to see how it turns out. The theme is mermaids!! It's so much fun to change things up a bit and throw a girly party! I'll be sure to post all about it!**


Photobucket

Tuesday, May 29, 2012

Recipe Time: Lemonade Cake

This recipe was really pretty simple and turned out great! I made it for a cookout we hosted over the holiday weekend and followed the recipe exactly. So perfect for summer!!


 I found the original recipe on Pinterest, but you can find it here on the Better Homes and Gardens website.

Lemonade Cake

Ingredients:

1/3 cup butter

3 eggs

2 1/4 cups all-purpose flour

1 teaspoon baking powder

1/2 teaspoon baking soda

1/2 teaspoon salt

1 1/3 cups sugar

1/4 cup frozen lemonade concentrate, thawed

1 teaspoon vanilla

1 1/4 cups buttermilk or sour milk

Yellow food coloring (optional)

Lemon Butter Frosting

Thin lemon slices (optional)

Directions:
1. Allow butter and eggs to stand at room temperature for 30 minutes. Meanwhile, grease a 13x9x2-inch baking pan; set aside. In a medium bowl stir together flour, baking powder, baking soda, and salt; set aside.


2. Preheat oven to 350 degrees F. In a large mixing bowl beat butter with an electric mixer on medium to high speed for 30 seconds. Gradually add sugar, about 1/4 cup at a time, beating on medium speed until well combined. Scrape sides of bowl; beat for 2 minutes more. Add eggs, one at a time, beating well after each addition. Beat in lemonade concentrate and vanilla. Alternately add flour mixture and buttermilk, beating on low speed after each addition just until combined. If desired, stir in a few drops of yellow food coloring. Spread batter into prepared pan.

3. Bake for 30 to 35 minutes or until top springs back when lightly touched. Cool in pan on a wire rack. Spread cake with Lemon Butter Frosting. If desired, garnish with lemon slices (slices should be removed before eating).

Lemon Butter Frosting
Yield: 2 cups Ingredients

1/3 cup softened butter

1 cup powdered sugar

1/3 cup frozen lemonade concentrate, thawed

1/2 teaspoon vanilla

3 cups powdered sugar

1 - 2 teaspoons frozen lemonade concentrate, thawed

Directions:
In a large mixing bowl beat softened butter with an electric mixer on medium speed until smooth. Gradually add the 1 cup powdered sugar, beating well. Beat in the 1/3 cup frozen lemonade concentrate and vanilla. Gradually beat in the additional powdered sugar. Beat in additional frozen lemonade concentrate to reach spreading consistency. Makes 2 cups.


Enjoy!

I'm linked up here:


Photobucket

Tuesday, May 1, 2012

Summer Family Fun List 2012

Last year I created a summer fun list for our family as a way to do all the things that we're always saying we're "going to do" and never actually get around to doing. It worked like a charm, even while I was 9 months pregnant, we were heading out for a picnic and picking strawberries! It was awesome! I was able to document most of the activities for the blog and for our Project Life album.

Since the list was such a success last summer, I decided I better make a new and improved version for this summer. I was able to include some new activities this summer because Hudson is a year older and able to participate in more activities.

So without further ado, I give you the 2012 Summer Family Fun List:

If you would like your own list you can download it for free HERE.


ENJOY!


*If you do download the file I would love a shout out and credit for my awesome creation.*

*Please note that this is for personal use only and may not be sold or reproduced for profit.*

I'm linking up here:


Photobucket

Friday, April 27, 2012

Who Loves New Recipes?!

Today I want to give a shout out to my good friend Melissa and her (along with her husband, Heeyoung) new food blog, H&M kitchen!


They love finding new and interesting recipes to try and share, as well as, adapting recipes to put their own spin on things and coming up with original recipes to share. Here are just a couple listed on the blog so far:

Prosciutto Wrapped Asparagus

Lemon Ricotta Pancakes
(I can't wait to make these!! Yum, yum, yum!)

On Saturdays they post a Simple Saturday recipe to help make cooking on the weekends that much easier. I already made this one for my son's birthday party and it couldn't have been easier:

Ravioli Lasagna

So, if you're a foodie or aspire to become one, hop on over to Melissa's awesome blog and check out all the other recipes she has to offer and don't forget to become a follower so you can check back daily!

Happy Friday!


Photobucket

Tuesday, April 17, 2012

Recipe Time: Pasta with Walnut Pesto

While I was browsing around http://tastykitchen.com/recipes/main-courses/pasta-with-walnut-pesto/ looking for some new recipes, I came across this recipe for pasta with a walnut pesto. I love walnuts and pasta and pesto! Plus, the directions were so simple. I pinned it to my recipe board on pinterest and made it a couple days later. It was so, so good! Even Hudson liked it! 

You can find the original recipe here.

Ingredients

1 pound Spaghetti


⅓ cups Olive Oil

1-½ cup Walnuts

½ cups Freshly Grated Parmesan

2 cloves Garlic

2 Tablespoons Lemon Juice

Kosher Salt To Taste

Finely Grated Parmesan And Toasted Walnut Pieces For Garnish


Preparation Instructions

Bring a large pot of salted water to a boil. Add the spaghetti and cook until al dente according to package directions.


To a food processor, add olive oil, walnuts, garlic, lemon juice and Parmesan and pulse until all the ingredients are combined. Season with kosher salt to taste.

Toss the walnut pesto with the pasta until the spaghetti is well coated.

Pile into bowl or a serving platter and garnish with finely grated Parmesan and crumbled toasted walnuts.


linking up here:


Photobucket

Friday, April 13, 2012

Five Spring Favorites

I've been bad about blogging lately. We've started to actually tackle some of things on our home projects list, so I've been keeping busy with that. Plus, we've had lots of family and friend get-togethers, which is awesome, but busy!

Right now we're in the process of switching Hudson into the bigger guest bedroom and moving Harper into his old room. The guest bedroom is bigger and fits his full sized bed much better. We bought paint for both room and yesterday I started the prep work to paint Hudson's room. His birthday party is next weekend, so I'm hoping to have his room finished by then. Fingers crossed!

Anyway, I digress. Today I thought I would share with you some of my favorite things so far this Spring.

1. Japanese Washi Tape
It's all the rage right now and I'm definitely on board! I've been using in in my Project Life and love the look it adds. I bought mine from Sugar B. Supplies on etsy.com.


2. The Hunger Games
I can't tell you how much I loved this trilogy! I thought the movie looked good, but I wanted to read the book before I saw it. I ended up reading all 3 books in a week!! Jeremy and I had a movie date last weekend to see it in the theater. Loved the movie too!


3. Kindle Fire
I got one from Jeremy and the kids for my birthday a couple weeks ago. I've wanted one for a long time! That's how I read the Hunger Games trilogy in a week! Awesome! The Kindle Fire is available on http://www.amazon.com/.


4. Awake
Jeremy and I were looking forward to this show starting about a month ago. It looked so interesting and different from anything on TV right now. It never disappoints! I recommend checking it out. You can watch old episodes on www.nbc.com.


5. Zen Habits
This is a website that emails out zen/meditation/relaxation subject related articles. They cover tons of different topics, but the articles always try to incorporate zen into your lifestyle. They are really good, relevant articles. Check them out at http://zenhabits.net/ to sign up.

P.S. They don't bog down your email either. Just a couple a week.

That's just a few of my favorite things. I could go on and on!

Well, I'm off to finish the paint prep work and start the process. I hope you all have a wonderful weekend!


Photobucket