
Tuesday, August 24, 2010
Weekend Project: Paint Guest Room
Soooo, our guest bedroom has been painted 3 times already and I haven't been thrilled with any of the colors. The first color I picked was a purple of sorts and that didn't even make onto a whole wall before I decided it was hideous. Then there was a moss green that I really liked, just not in that room. And finally we ended up with a very pale blue, so pale that it sometimes looks white. I had visions of a pale blue room with glossy black furniture and white bedding...but that never happened and never will. A few months ago I found some bedding on Amazon.com that I really liked and that's what is in there now. It doesn't match the wall color whatsoever. The room looks like a disaster. So, I'm finally going to paint tn this weekend in hopes of never painting it again. This time I'm thinking a chocolate brown to warm it up and match the pretty bedding. I'll wait and post before pics when I show you the after, so I guess that means you'll have to visit my awesome blog again if you want to see how it turns out!

Monday, August 23, 2010
Pumpkin Update: A Baby
There it is! The first actual pumpkin on our vine! I'm soooo excited I can hardly contain myself! It's actually much bigger than it looks in this picture. And after checking out the entire vine, I'm happy to report that there are 5 other female flowers just waiting to bloom and turn into pumpkins. I also got an update from my mom yesterday and she counted 13 on their vine! Can you believe that?! Now I even more excited to see how many we end up with.

Uneventful Weekend
We didn't do anything around the house this weekend, not did I do anything crafty...well I did do one thing that I actually started last week, but you have to wait until next week to see it. But here is a little preview.


cute huh?!
Friday, August 20, 2010
5 Fall Favorites
I thought it would be fun to share a list of the 5 things I love for the fall season, given that it's just around the corner.
1.

2.

3.

4.

5.

1.

Of course fall=football and I LOVE college football especially my Nebraska Cornhuskers! I always buy at least one new Husker shirt before the season starts. I think I'm getting this one for the first game.
(photo courtesy of huskerhounds.com)
2.

I adore the smell of pumpkin candles. Nothing says fall to me more than that warm pumpkin pie scent filling my house! So cozy! I burn them all fall.
(photo courtesy of yankeecandle.com)
3.

My trusty crock pot. I use it to cook so much more often in the fall and winter. I'm always looking for new recipes to try, so if you have any good ones, please send them my way!
4.

Ghost Hunters (a.k.a. TAPS) on the Syfy channel. My hubby and I have been obsessed with this show for a few years now. It's back for a new season starting Wednesday at 8:00. It's the only ghost show that I take seriously. They are real professionals and find some of the best (scariest) evidence! Oh, and they always do a live show on Halloween night.
(photo courtesy of syfy.com)
5.

I can live without my Burt's Bees lip balm. I swear that I'm addicted! It's the best lip balm I've ever used.
So there you have it. I'm sure I could've made this a list of 10 or more things that I can't live without in the fall, but I don't want to bore you too much! Happy Friday!
Thursday, August 19, 2010
Pumpkin Update: The Start of a Fruit
I went out to check on the pumpkins this afternoon (I've been trying to stay away because of all the mosquitoes that surround it) and it's looking much better and I think I even spotted the start of a pumpkin. It's about time!! I had given one of the other seedlings that I started this spring to my parents who live in Sioux Falls and they already have 3 growing on their vine. I was so jealous, but it looks as though we might get a least one pumpkin after all!


It's starting to creep into our neighbors side yard...oops
Here is the tiny little pumpkin. Yay!! This is the first female flower that I've seen on the vine since the cucumber beetle infestation. I also noticed another one right beside this one, only it's smaller, but maybe that one will start to grow too.

I love seeing sun tea jars outside brewing. It won't be long before it will be too cool to make my sun tea. bummer. So, I'm taking advantage of the weather as much as possible before it's too late.

Wednesday, August 18, 2010
Personalizing Your Home
For me, it is so important to have our home be personalized to us and our life together, so one of the things we've done to make it more personalized is to bring in custom artwork (you can find other previously posted personalized pieces here and here). Of course, like most people, we have tons of family photos everywhere, but we wanted our other artwork to reflect us and are meaningful in some way.
This is by no means a new idea, but one of the things we did that we really love is a blow up picture of a photo that we took during our trip to the Big Island of Hawaii. *You may have even seen this same waterfall in pictures other places...it's pretty well-known.
So, this picture went from looking like this (4x6)...

To looking like this.
At the moment it's hanging in our basement family room. It's now a framed 8x10 print. Not only is it a beautiful picture, but it's also a constant reminder of our amazing vacation in Hawaii (which is where we got engaged!)

I think sometimes people are afraid to use their own photos to decorate because they might not look professional enough, but that's what makes them perfect. They are yours and no one elses. We have so many other great pictures from that trip and other trips that I would love to find a place for as well...I think I need a bigger house!
National Cupcake Day??
I've been hearing mixed messages about today being National Cupcake Day. Well, even though it might not be a declared holiday...little man and I decided to make some cupcakes to celebrate anyway! I wanted some new sprinkles for the occasion, but ended up not finding what I was looking for, so I used my favorites of the moment. I kept it simple today and used a box mix and premade frosting, but they're still super delicious and cute as always!


Tuesday, August 17, 2010
Family Fun Night
Now that I'm a mom I find myself always looking for new ways to entertain my 15 month old son (which isn't always easy) and make family memories. While flipping through my latest Parents magazine I came across an advertisement for a new Mickey Mouse Clubhouse Special. I tore out the page and hung in on our refrigerator so I won't forget (not like I would). My little man absolutely loves the show! Now that we have an activity planned, my next task is to come up with a fun dinner and dessert idea to have a little party, and as it turns out, it looks like I might have some help in that area because they even have recipes and fun printouts for the kiddo's on the website. I'm so excited for our family fun night! If you have little ones I encourage you to check it out too!


photo courtesy of dinseychannel.com
Monday, August 16, 2010
Recipe Time: Butterfinger Dessert
This is a recipe that was handed down to me from my great grandma. She used to make it for us every time my family would visit her and my great grandpa when I was growing up. The taste instantly takes me back to my childhood and being at their house, which I loved visiting! I don't know where it comes from originally, but it has been in our family for quite some time. We even served it at our wedding rehearsal dinner and got tons of compliments! I hope you decide to give it a try. It's a great summer recipe!
Ingredients:
10 graham crackers, finely crushed
30 soda crackers, finely crushed
1/2 cup of unsalted butter, melted
1 pkg. vanilla instant pudding
1 pkg. chocolate instant pudding
2 cups of milk
1 qt. vanilla ice cream, softened
1 8 oz. container of cool whip
2 Butterfinger candy bars, frozen and then crushed
Directions:
Combine all cracker crumbs and add melted butter, mix thoroughly. Place 2/3 of crumbs in a 9x13 pan and pat. Prepare instant puddings together as package directs, using only 2 cups of milk. Blend softened ice cream into pudding until smooth and pour over crumb crust.
Refrigerate until somewhat firm.
Spread cool whip over ice cream. Mix remaining cracker crumbs and Butterfingers together and sprinkle over the top.
Refrigerate overnight.

Here is a better look at the layers of deliciousness!

Sunday, August 15, 2010
Bringing In Some Green...and White
We were on vacation this past week and made a trip to IKEA where I picked up some cute little plants to bring some green into our home. Unfortunately, I don't have a very green thumb (I'm working on it though!), but I thought I'd take a chance with some succulents. I always hear how easy they are to take care of, meaning that they're super low maintenance, which seems like a great way to start.
The shiny new white pots are the best part at just $1.99 a piece! I adore these pots from IKEA and have wanted some for a long time and now I finally have some of my own. I can't wait to find the perfect spot to put them all!


Tuesday, August 10, 2010
Ladies Luncheon
Last Sunday I hosted the 2nd annual ladies luncheon for some of my girlfriends. I hosted the first ladies luncheon last year because I had a new baby and hadn't had the chance to spend much time with my friends all summer. This year I kept it simple and just sent out evites from http://www.evite.com/.
Once the invites were sent, I set up a menu:
Appetizers:
Roasted Chicken Purses
Entree:
Penne in Almond Sauce
Fresh Fruit
Dessert:
Butterfinger Ice Cream Dessert (a recipe from my great grandma)
After the menu was set, I worked on coming up with a special favor for the ladies to take home. Since I know all of my friends enjoying cooking...and food as much as I do, I decided that homemade recipe cards would be the perfect favor. So I got to work on the computer and created these:

The evite that I sent out had lemons and limes on it, so I stuck with that color palette for the party.

The party was a success! Thanks so much for joining me girls! It was so nice to see all of you. I can't wait until next year! Maybe we'll have to have a dinner party this winter ; )

Monday, August 9, 2010
Custom Artwork
As I mentioned before, I am working on redecorating our son's bedroom. Well, on Friday I finally finished with his custom artwork and I am extremely proud of the way it turned out! I wanted something bright and colorful to reflect his big personality and I think I achieved just that. I got my inspiration from a shop on etsy that was selling similar artwork, but at $40 a pop, it just wasn't in our budget. So, after pining over it long enough I figured why not try and make something myself, plus it gave me the opportunity to make it exactly how I wanted it! Here is what I did:
Supplies:


 Once I gathered all my supplies, I got to work. I cut everything by hand except the fire and the tent, which I found examples for on google images, but you could definitely use stencils if you're not quite as handy with the scissors.
Once everything was cut out, I arranged it on the wood the way I wanted it and then sealed it with the mod podge which I got in satin finish so that it would have a slight sheen to it. SO simple!

Here is the finished product:


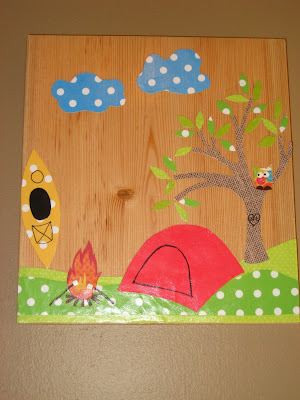


 Sorry, the pictures aren't as good as I would like them to be. I have a feeling our camera won't be around much longer! I chose to design scenes of outdoor activities that we enjoy or wish we could enjoy, but you could make them look any way you'd like. I think any type of animal would be cute or maybe little houses, or flowers...I could go on and on. I had such a great time making these that I plan to do the same thing for each one of our babies...when we have more babies, that is!


Supplies:
3-12x12 pieces of wood, cut edges sanded

lots of scrapbook paper

mod podge and scissors

Once everything was cut out, I arranged it on the wood the way I wanted it and then sealed it with the mod podge which I got in satin finish so that it would have a slight sheen to it. SO simple!

Here is the finished product:
Hotair Balloon Ride

Sun and Surf

The Great Outdoors


Here is Hudson admiring his new custom artwork. He loves pointing at the pictures so we can tell him what they are.

His favorite one is the turtle.

Thursday, August 5, 2010
Show & Tell: White Beauty
I inherited this pretty little white dish from my grandma. I love the detail of the design and I am a big fan of having pops of white throughout my home decor. Right now it's being used to hold some of the jewelry that I wear on a regular basis, but I'm hoping that someday soon it will be moved to my home office desk. Looking at it reminds me of my grandma and makes me so happy! I'd love to know what other people have as reminders decorating their home.


Tuesday, August 3, 2010
Pumpkin Update: Not Looking Good
Somehow our pumpkins are still alive despite the fact that they have been taken over by cucumber beetles. As you can see in the pictures below, there are 2 offshoots, but the main vine where they connect looks pretty bad...as in dried up and dead. Now, I'm no pumpkin growing expert, but I don't think this is what is supposed to happen.

Here is a pic of the main root source. I'm not sure how the rest of it is even still alive!

Even though it doesn't look like we'll be getting any pumpkins off this, I couldn't just let it die considering the offshoots still look fairly healthy, so I made a trip to Earl May and asked for something that might work to get rid of our pesky pests. This is what they suggested:

So, I sprayed it last night and again this morning when there were more beetles present. Hopefully it will get rid of them so there might be a chance of the plant surviving, but the spray didn't seem to affect the bugs on impact, so I won't keep my hopes up! I'll be so disappointed if it dies and a little discouraged from trying again next year...
Monday, August 2, 2010
Mission Complete! Dresser Redo
It's finally finished! Our $30 craigslist purchase made back in April for our son's bedroom. It took what seemed like forever for us to find matching hardware that we liked and that would fit the holes. The problem was that the small drawers holes are 3 in. centers and the big drawers are 4 in. centers. Most hardware only comes in one or the other, but we eventually found some online and are so pleased with the way they look. I was a little nervous to order something like that without seeing it in person first, but it worked out and I couldn't be happier with the finished product. So, first we'll take another look at the before pictures and then the reveal of the after!


 This project took longer than anticipated due to the problem finding hardware that would work and that we both liked, but now that it's in the room, it was worth the wait. This is my first big redo and I'm so proud of the way it turned out! I hope you like it too! I can't wait for the next one!
Here is the cost break down:
Dresser $30
Hardware $38
Total Cost: $68 I love a good deal!!
Here is the dresser before sanding (my helpful hubby did all the sanding):
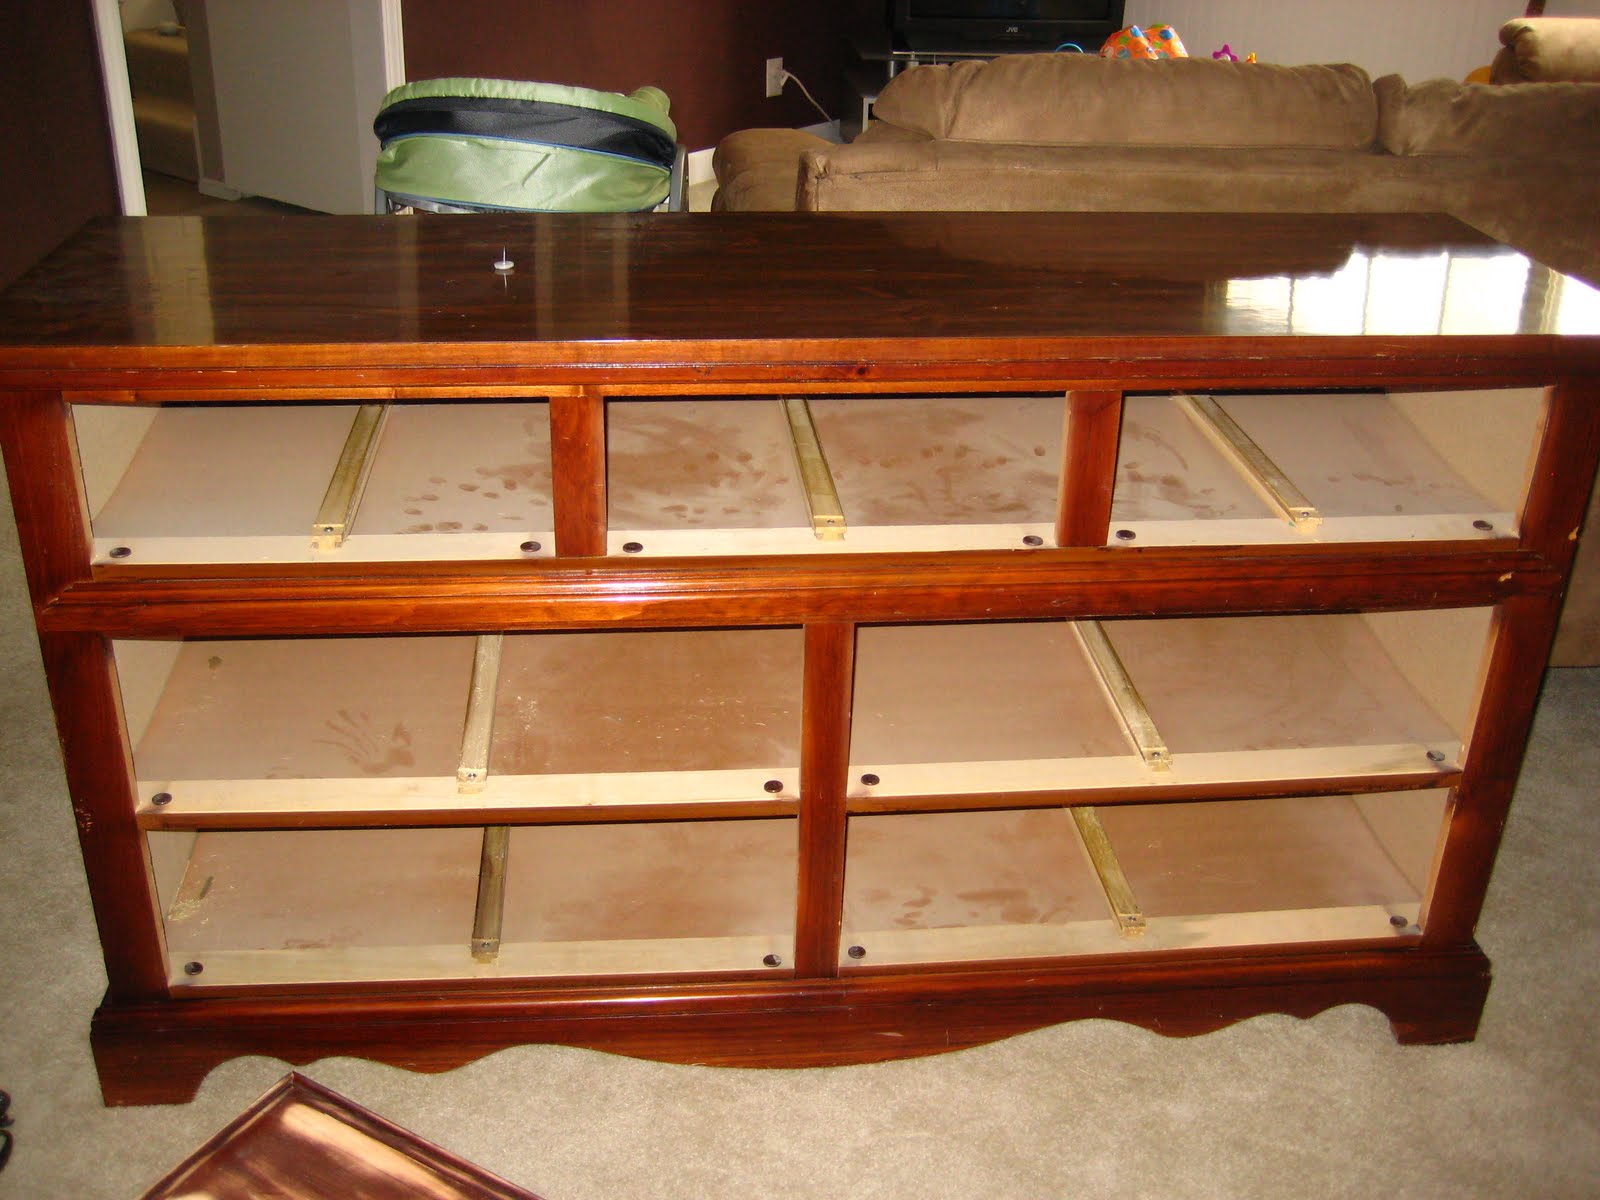

And don't forget about the outdated hardware:

Here it is after the coat of oil based primer which is supposed to help keep the latex paint from bubbling up as much when you roll it on:

Grand Finale
And here is the finished dresser!! We just love it! Notice that we removed the decorative trim that was along the bottom. It was a little too frilly for our son's room and we wanted it to have more of a cleanlined look. The paint I used was Fresh Aire semi gloss white paint and I applied it with a foam roller. It took 4 thin coats. Once the paint was dry, I applied one coat of the minwax fast-drying polyurethane.

The new updated hardware

We even took the time to line the top drawers with a nice dark brown felt. It makes the dresser seem more expensive. Jeremy (my helpful hubby) really wanted to line the drawers after we took a trip to Nebraska Furniture Mart and all the pricey dressers had lined drawers. He's so fancy!

Here is the cost break down:
Dresser $30
Hardware $38
Total Cost: $68 I love a good deal!!
Subscribe to:
Posts (Atom)